Promotions are imported through the Promotions menu.
Go to: Back Office > File > Sales > Promotions > Promotions > Select the "Import" option on the left-hand side menu.
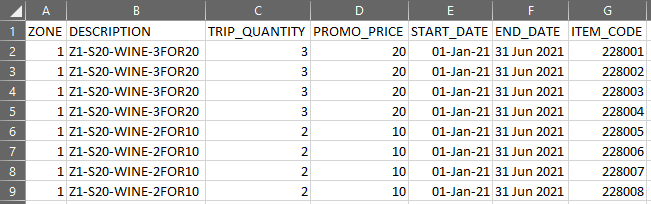
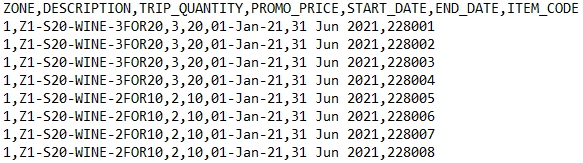
It’s possible to import promotions using the following headers:
ZONE, DESCRIPTION, TRIP_QUANTITY, PROMO_PRICE, START_DATE, END_DATE, ITEM_CODE, DPT, CUSTOMER_TYPE, CUSTOMERTYPE, CUSTOMERTYPERANGE, CUSTOMER_TYPE_RANGE, POS, POS_NUMBER, TERMINAL, POS_RANGE, LOCATION, LOCATION_RANGE, SITE, SITE_RANGE, PRICE_LEVEL
The Promotion Group will be created when the file is imported and is based on the filename being imported.
If one of the items imported is within an Attribute family, the other items within the family will be imported automatically.
A family item is any item that has been linked to the designated Family Stock Item Attribute.
This can be set by going to Setup > Global Options > Other Options > Stock Item Linking > Attribute Type.
ZONE – Currently unused but included for future plans. Header must be included but data can be left blank.
DESCRIPTION – Promotion Description.
TRIP_QUANTITY – The number of items required to purchase to trip the promotion (e.g. buy 3 quantity of the item to trip the promotion). Both TRIP_QUANTITY and TRIP_AMOUNT can be used in the Promotion Import File, however, if a value is entered in both the TRIP_QUANTITY and TRIP_AMOUNT fields, the TRIP_AMOUNT will take precedence. If a TRIP_GROUP header with a value between 1 to 3 has not been included in the Promo Import File, the Trip Quantity will be set against the Trip Group 1/Trip Condition Set 1 by default. Also note that it isn't necessary to populate the TRIP_QUANTITY field for every item in a Trip Group. Populating this field for the first item within a Trip Group/Trip Condition Set will result in all consecutive items in that Trip Group inheriting the same Trip Quantity. It should also be noted that if the Trip Quantity differs for each item in a Trip Group/Trip Condition Set, the last item in the Trip Group which contains a Trip Quantity value will be set as the Trip Quantity for that entire Trip Group.
TRIP_AMOUNT – The dollar value that the customer needs to spend on items included in the promotion to trip the promotion (e.g. spend $X.XX on these items to trip the promotion). A whole number (e.g. 5) or decimal value (e.g. 5.50) can be specified. Both TRIP_QUANTITY and TRIP_AMOUNT can be used in the Promotion Import File, however, if a value is entered in both the TRIP_QUANTITY and TRIP_AMOUNT fields, the TRIP_AMOUNT will take precedence. If a TRIP_GROUP header with a value between 1 to 3 has not been included in the Promo Import File, the Trip Amount will be set against the Trip Group 1/Trip Condition Set 1 by default. Also note that it isn't necessary to populate the TRIP_AMOUNT field for every item in a Trip Group. Populating this field for the first item within a Trip Group/Trip Condition Set will result in all consecutive items in that Trip Group inheriting the same Trip value. It should also be noted that if the Trip Amount differs for each item in a Trip Group/Trip Condition Set, the last item in the Trip Group which contains a Trip Amount value will be set as the Trip Amount for that entire Trip Group.
PROMO_PRICE – Price of the promotion.
START_DATE – Start date of the promotion.
END_DATE – End date of the promotion.
ITEM_CODE – Stock items to be included in the promotion. The ITEM_CODE will search the Stock Item Code, the Primary Scan Code (the Scan Code that is visible when modifying a Stock Item) and Scan Codes in Alternate Codes.
DPT - This field was added in v8 Build 17. Specify the Department Code to be included in a Trip Group/Trip Condition Set. A DPT doesn't have to be specified and the DPT header doesn't have to be used; if including the DPT field in the header, specify an ITEM_CODE or DPT for each line in the import file as required (don't populate both the ITEM_CODE and DPT fields with values on a single line of the import file; if Departments and Items need to be included in a Trip Condition Set, create a new line in the import file for each Department or Stock Item by populating either the DPT or ITEM_CODE field as required; leave the unused field on the line of the import file as blank).
CUSTOMER_TYPE or CUSTOMERTYPE - Customer Type Code
CUSTOMERTYPERANGE or CUSTOMER_TYPE_RANGE - The range of Customer Type Codes expressed as 1-4, 16. Anything fields that contain a comma must be contained within quotes, so "1-4, 16".
POS or POS_NUMBER or TERMINAL - POS Terminal Code
POS_RANGE - POS Terminal Code range expressed as 1-4, 16. Anything fields that contain a comma must be contained within quotes, so "1-4, 16".
LOCATION - The Location Code
LOCATION_RANGE - The Location Code range expressed as 1-4, 16. Anything fields that contain a comma must be contained within quotes, so "1-4, 16".
SCAN_CODE - The Scan Code of the Stock Item to be included in the promotion. The SCAN_CODE field will search both the Primary Scan Code and any Alternate Codes, but will not search the Stock Code field. If the Item_Code is blank, it will attempt to find the item using the Scan_Code.
SITE - The Site Code
SITE_RANGE - The Site Code range expressed as 1-4, 16. Anything fields that contain a comma must be contained within quotes, so "1-4, 16".
PRICE_LEVEL - The Price Level Code.
DISCOUNT_TYPE - The type of discount you want to create. To specify the Discount Type, enter the integer that corresponds to the Discount Type you want to create. Discount Types are listed below:
1 - $ Discount off Items
2 - % Discount off Items
3 - Fixed Price for Items
4 - Bonus Stock Item (use a BONUS_ITEM header in the Import File and enter the Bonus Stock Item Code within the field)
5 - Cheapest Item % Discount
6 - Unit Price Each
7 - $ Discount off Total
8 - Expensive Item % Discount
9 - $ Discount Each Item
10 - Discount Based on Price Level
TRIP_GROUP - This is the Trip Group/Trip Conditions Set that the Items will be listed in within the Promotion. Three Trip Groups are available; enter 1, 2 or 3. If a TRIP_GROUP is not included, Idealpos will default to using TRIP_GROUP 1.
As the POS Range, Location Range, Site Range, Price Level all share the same field, whichever field comes first will take precedence if you have a record that has data in both fields.
Once you have created the file, go to File > Sales > Promotions > Promotions > Import > Select your file > Open.

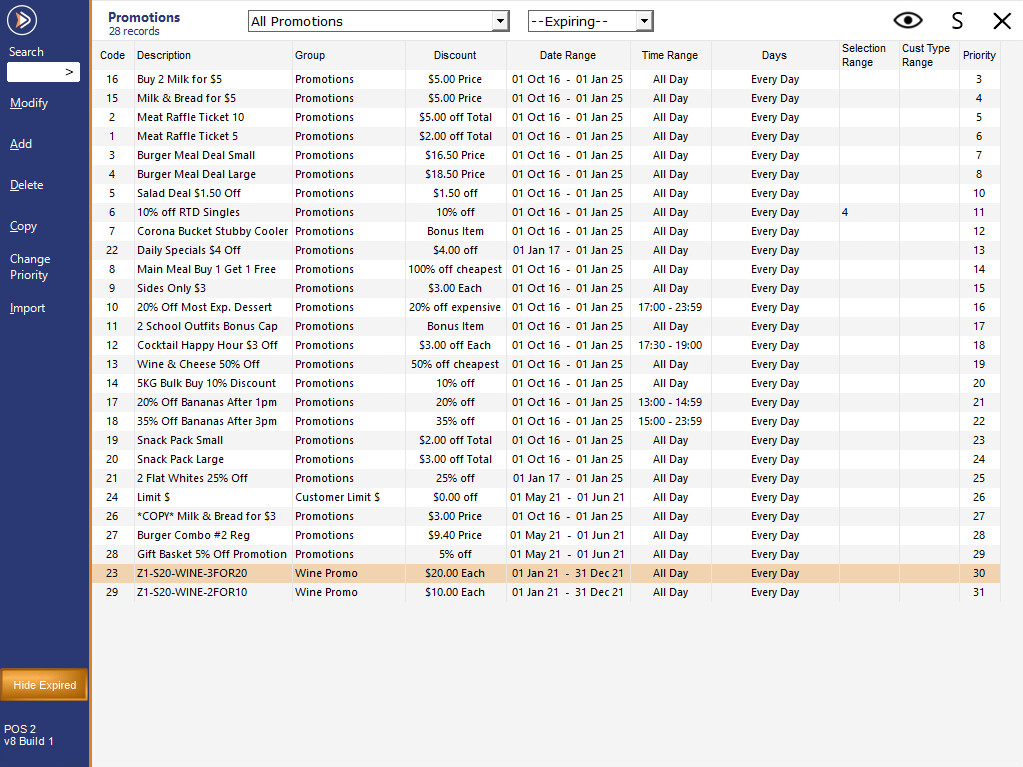
The promotion(s) will be added to the bottom of the list where you can further edit them for additional options.
Note!
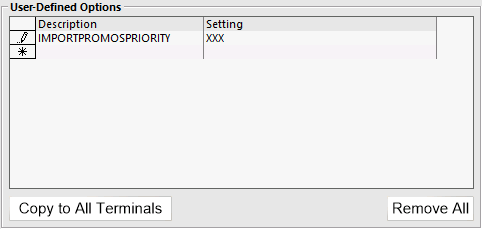
If Imported Promotions need to have a higher priority, a User-Defined Option can be created prior to importing new Promotions.
In Idealpos v9 Build 8 or higher, create the following User-Defined Option by going to:
Back Office > Setup > POS Terminals > Select a POS Terminal > Modify > POS Settings > User-Defined Options.
Create the following User-Defined Option:
xxx is the priority that the newly imported Promotions will be set to; enter the required priority.
E.g. If a value of 1 is entered as the Setting for the User-Defined Option, this will set all new Promotions to Priority 1 and push all the other Promotions down the list.
So, in an Import File, the last imported record will become the highest priority promotion.
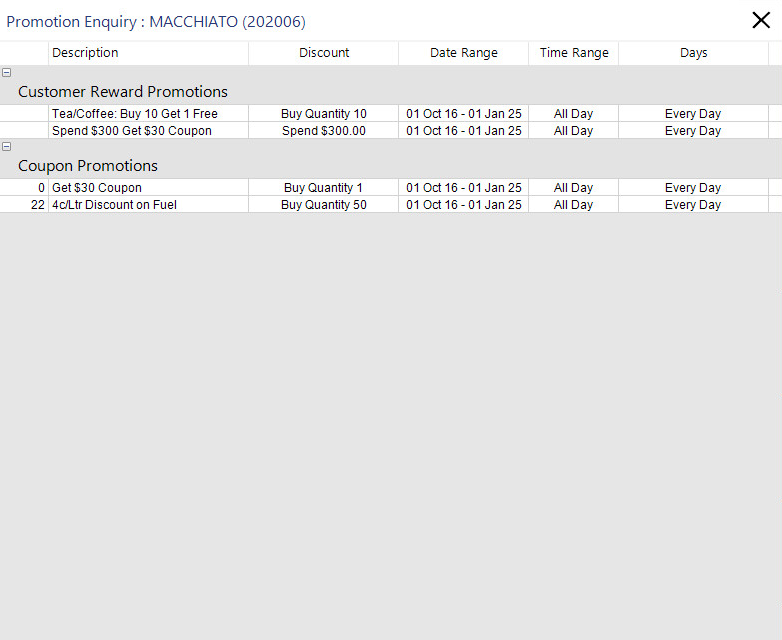
This function will allow you to find out what Promotion an item is included in before you enter the item into a sale.
Select this button, then enter the stock item and the promotions will be displayed on screen.
Go to Setup > POS Screen > POS Screen Setup > Function: Promotion Enquiry.
This feature allows you to check if the item is part of a promotion and the price will change when the sale is finished.
Go to Setup > POS Screen > POS Screen Setup > Function: Price Enquiry.
During a sale, you can press the button, and select an item.
A message will display on screen showing the item and price.
If the item is available for any type of promotion, you can select to view the applicable promotions to see what can affect the price of the item when sold.

When you select Yes, the Promotions Enquiry screen will display.
The fields outlined above can be used together with the following fields to import data for Coupon Promotions.
Note that the Import Coupon functionality/fields outlined below only supports importing limited fields.
It does not support importing settings such as Serialised Tracking/Print Only, Apply Discount to All Items/Only Items Below, etc.
Refer to the Coupon Promotions topic for further information about using Coupon Promotions.
The following is a sample import file that utilises the above fields:
ZONE,DESCRIPTION,TRIP_AMOUNT,DISCOUNT_TYPE,PROMO_PRICE,START_DATE,END_DATE,ITEM_CODE,USER_DEFINED_TEXT,INHIBIT_POINTS,EXTERNAL_DESCRIPTION,DATE_REDEEM_FROM,DATE_REDEEM_TO,REDEEM_DAYS,POS_REDEEM_RANGE
,Coupon Promotion,10,1,2.00,01/07/2025,31/12/2025,205401,USER DEFINED TEXT HERE,1,EXTERNAL DESCRIPTION HERE,01/08/2025,31/12/2025,14,1-2
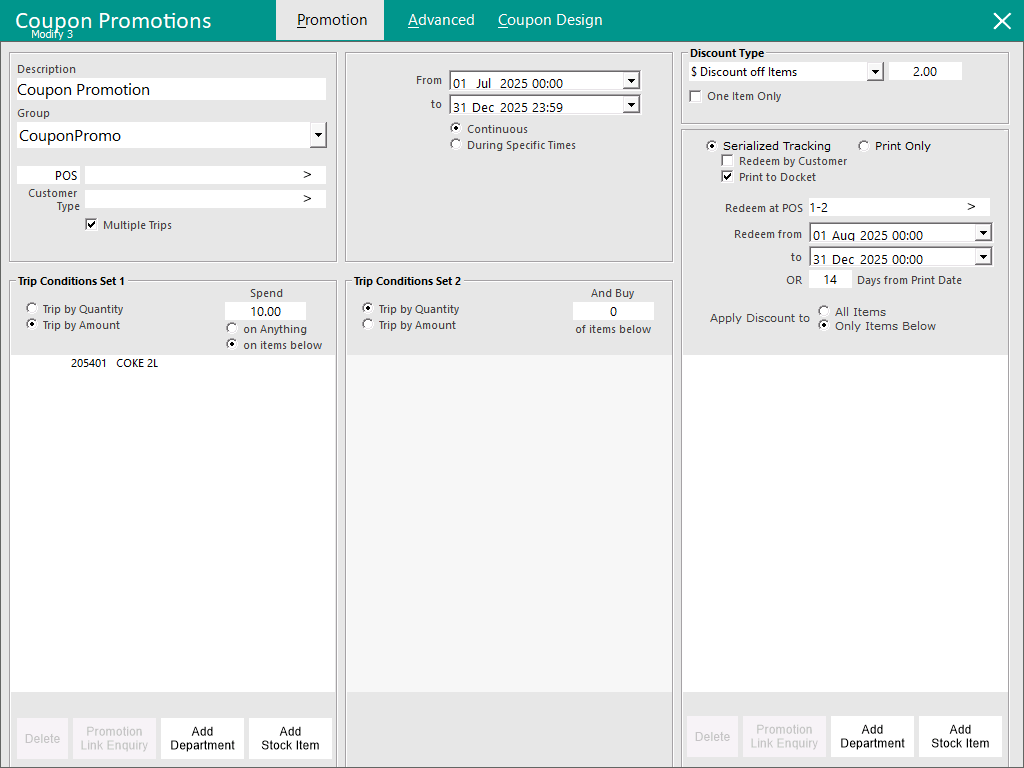
The following shows the resulting Coupon Promotion that is created in Idealpos after importing the above sample file.
Coupon Promotions - Promotion tab:
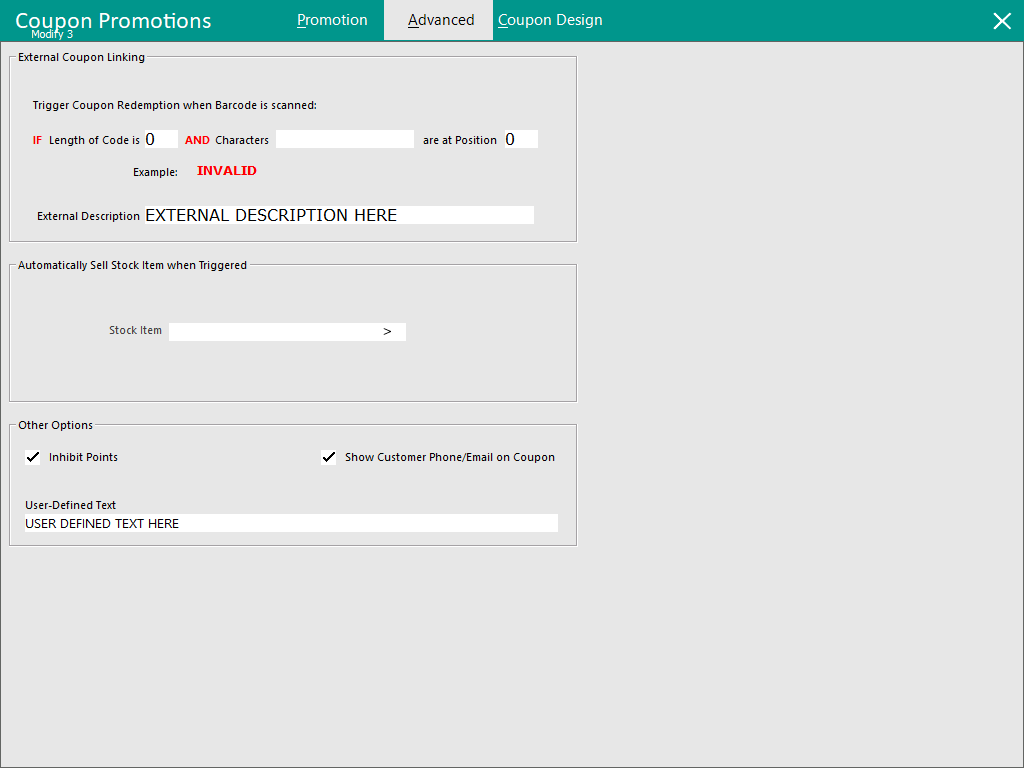
Coupon Promotions - Advanced tab: