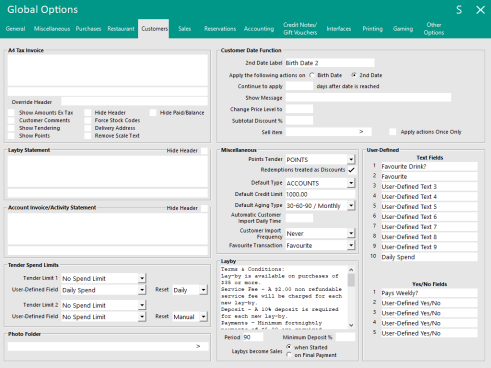
The Customers Tab is broken up into nine different sections which are:

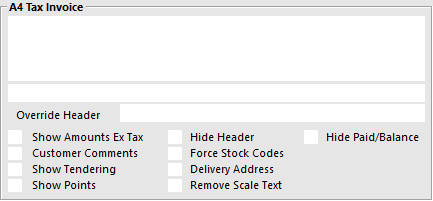
A4 Tax invoice section is where you can enter your information that you want your Customers to have on their Invoices.
Information such as banking details, trading terms, tax settings, tendering and delivery address are available.
Override Header allows you to rename the Tax Invoice header of A4 invoices given to Customers.

Idealpos can be configured to save each sale as a PDF file via a User-Defined Option.
This may be useful if an A4 PDF file is required for each sale performed at a POS Terminal.
The end of the filename will include AuditNo-POSNo (AuditNo will be replaced with the Audit Number and POSNo will be replaced with the POS Terminal Number).
Note that this User-Defined Option does not require the Yes/No Option Automatically Print A4 Invoice after each sale to be enabled.
If both an A4 Invoice Printout and a PDF file are required, this User-Defined Option can be configured and the Yes/No Option can be enabled simultaneously.
To configure this option, go to: Back Office > Setup > POS Terminals > Select a POS Terminal > Modify > POS Settings tab.
In the User-Defined Options section on the bottom-left corner of the window, create the following User-Defined Option:
Description: SAVEINVOICEPATH
Setting: Enter a path to where the PDF files should be saved.
Note that the Setting path should include the required filename at the end of the path.
E.g. C:\Temp\TaxInvoice\TaxInv
In the above example, Tax Invoices will be saved with a filename of "TaxInv[AuditNo-POSNo].pdf" into the path "C:\Temp\TaxInvoice\".
So, if the Audit Number of a sale is 123 on POS 1, the resulting filename will be "TaxInv123-1.pdf".
It is recommended that the required path is created prior to setting up this User-Defined Option.
This function will allow a link to a particular Tender Type using a value entered in a User Defined Text Field.
An example of this would be allowing Staff to spend up to $50 (with a 25% discount) on their Staff Card daily, with all other purchases requiring a different Tender.
To configure this option, go to Setup > Global Options > Customers > Tender Spend Limits.
You have to configure three drop down menu selections to trigger the value for each Tender Limit.
Tender Limit 1/2 - Select the Tenders you want the limit to be used against.
User-Defined Field - Select which field you will enter the value against.
Reset - Select how you want the limit to be reset from Manual, Daily, Weekly, Monthly, Yearly or Financial Year.
While on the Customer tab, change the description of the User Defined Text field to the description you want to use.
Go to File > Customers > Add/Modify > Advanced > Enter a dollar value in the selected field for all required Customers > Save.
Each Customer can have a unique value.
When you have selected to reset the Tender Spend Limits manually, a new option will appear under the Utilities menu of the Back Office.
Go to Utilities > Reset Tender Limit (*tender). In our example we have selected POINTS tender to be reset manually.
You will need to confirm the Reset of the Tender.
The window will confirm the Tender has been reset.
The Photo Folder field is used to specify a folder location where Customer photos are located.
This folder is only used when a customer who has not had a photo configured against their Customer record in the system is selected during a POS transaction.
If a photo exists for the customer in the configured folder, that photo will be displayed on the POS screen.
To use this function, find the Customer Code by opening their record in the Customers screen (File > Customers > Customers).
The Customer's code will be displayed in the Code field.
Create an image for the Customer in JPG format and give the image a filename which matches the Customer Code (e.g. 212.JPG), then copy the image into the location.
When that Customer visits the store and is added to the POS transaction, their photo will be displayed.
Customer Date Function area can be used to trigger an anniversary or event using the date fields in the Customer details.
2nd Date Label
This changes the name of the field in the Customer database screen.
Apply the following actions on Birth Date/2nd Date
Sets which date function activates the setup actions.
Continue to apply
Set this to how many days the Customer has to take advantage of the actions from the date set.
Show Message
This will display a message in the middle of the screen when the Customer is added to the sale.
Change Price Level to
Set this to a different level if you wish for the Customer setup.
Subtotal Discount %
This can be set for specific discount.
Sell Item
This allows you to sell a Stock Item. It may be a free item as a gift for the Customer.
Apply actions Once Only
This will apply settings on the one sale for the Customer only.
The Miscellaneous section is where you can set various Customer settings.
Points Tender
This allows you to specify which tender will be used when redeeming points from the loyalty program.
When the selected tender is used to finalise a sale, Idealpos will deduct points from the customers account to pay for the sale.
Redemptions treated as Discounts
By default, this option is enabled. Prior to Idealpos 7.1 Build 9, this option was hard-coded in an enabled state.
Systems running Idealpos 7.1 Build 9 or higher can toggle this option.
When enabled, any Points Redemption value that was used to purchase Stock Items will be represented in the Discount column of the Reports (e.g. Stock Item Sales Report).
The below example shows a Stock Item Sales Report that was generated when the "Redemptions treated as Discounts" option was enabled and items purchased with a Point Redemption.
When disabled, any Points Redemption value that was used to purchase Stock Items will not be represented in the Discount column of the Reports (e.g. Stock Item Sales Report).
The below example shows a Stock Item Sales Report that was generated when the "Redemptions treated as Discounts" option was disabled and items purchased with a Point Redemption.
Default Type
This allows you to select which Customer Type new customers will be added to by default.
This can be changed when modifying the Customer.
Default Credit Limit
This value is used to set the default credit limit when creating new Account and Bar Tab Customers.
This can also be changed when modifying the Customer.
Default Aging Type
This setting is used to specify the Default Aging Type that will be selected when creating a new Account Customer.
Whichever Aging Type is selected here will be reflected on the New Customer screen which is accessed by going to:
File > Customers > Customers > Add > Enable "Account" Checkbox > Aging Type
Automatic Customer Import Daily Time and Customer Import Frequency
These are used with importing Customers at regular intervals.
Favourite Transaction
This function is used to trigger the entry of a regular transaction the customer makes when in your establishment.
The Layby section is used for defining the Layby terms and conditions that you want to print out on the Layby receipt.
Period
This field is to define the length of time in days you want to hold Laybys for.
Minimum Deposit %
This field is what you require as a deposit for a Customer to be able to place a Layby.
Laybys become Sales
Select when Laybys become Sales, as this can affect the way the stock control is handled.