
The Printing Tab is available via Back Office > Setup > Global Options > Printing, and is broken up into seven different sections which are:
Standard Formats
Order by Print Group Formats
Order by Seat/Print Group Formats
Order by Print Group/Seat Formats
Group Instructions by Seat Formats
If you want to use these printing options without the Restaurant (RST) licence, you can set the Yes/No Option: Non-RST license use Restaurant Kitchen Formats.
Items will be printed in the order they were entered into the POS.
Items will be printed in the order they were entered into the POS, but will have a Seat Number on each item.
If Print Groups are linked to the Departments, items printed on the Kitchen Printer will be separated by the designated groups.
If Print Groups are linked to the Departments, items printed on the Kitchen Printer will be separated by the designated groups, and items that are doubled up will accumulate. Items that are doubled up which contain instructions will not be accumulated.
If Print Groups are linked to the Departments, items printed on the Kitchen Printer will be separated by the designated groups, and items that are doubled up will accumulate. Items that are doubled which contain instructions will also be accumulated.
Note that in order for doubled up Items with instructions to be accumulated, the instruction items will need to be entered in the same order for each of the doubled up items.
E.g. If Cappuccino is added with instructions of Extra Hot and Extra Choc, each additional Cappuccino that is ordered with those same instructions will require those instructions to be entered into the sale in the same order (i.e. add Extra Hot, then add Extra Choc, in that order).
If a double of the same Item is entered, but its instructions are entered in a different order, the item will not accumulate, even if the 'With Instructions' option is enabled.
Items will be grouped by Seat number.
If a seat number is not selected, they will print in the order of the Print Groups.
Items will be grouped by Seat number and any double up items [without instructions] on the same seat will be accumulated. If double up items contain instructions, they will not accumulate.
If a seat number is not selected, they will print in the order of the Print Groups, and accumulate any items [that do not contain instructions]. If double up items contain instructions, they will not accumulate.
Items will be grouped by Seat Number and any double up items [including double up items with the same instructions in the same order] will be accumulated.
If a Seat number is not selected, the items will print in the order of the Print Groups, and any double up items will be accumulate [including double up items with the same instructions in the same order].
Note that in order for doubled up Items with instructions to be accumulated, the instruction items will need to be entered in the same order for each of the doubled up items. Those doubled up items with the same instructions also need to be entered against the same seat number.
E.g. If Cappuccino is added with instructions of Extra Hot and Extra Choc, each additional Cappuccino that is ordered with those same instructions will require those instructions to be entered into the sale in the same order (i.e. add Extra Hot, then add Extra Choc, in that order).
Each doubled up Cappuccino with the same instructions in the same instruction order will need to be placed on the same seat in order for it to accumulate. Doubled up items [with or without instructions] that are placed on multiple seats will not accumulate.
Note that if a double of the same Item is entered on the same seat, but its instructions are entered in a different order, the item will not accumulate, even if the 'With Instructions' option is enabled.
Items will be separated by the respective Print Groups and each item will display the seat number allocated for it.
Items will be separated by the respective Print Groups and each item will display the seat number allocated for it, multiple items [without instructions] that are the same on each seat will be accumulated. Items that contain instructions will not accumulate.
Items will be separated by the respective Print Groups and each item will display the seat number allocated for it, multiple items that are the same on each seat [including multiple items with the same instructions in the same instruction order] will be accumulated.
Note that in order for doubled up Items with instructions to be accumulated, the instruction items will need to be entered in the same order for each of the doubled up items. Those doubled up items with the same instructions also need to be entered against the same seat number.
E.g. If Cappuccino is added with instructions of Extra Hot and Extra Choc, each additional Cappuccino that is ordered with those same instructions will require those instructions to be entered into the sale in the same order (i.e. add Extra Hot, then add Extra Choc, in that order).
Each doubled up Cappuccino with the same instructions in the same instruction order will need to be placed on the same seat in order for it to accumulate. Doubled up items [with or without instructions] that span across seats will not accumulate (e.g. Seat 1 - 1x Cappuccino Extra Hot Extra Choc, Seat 2 - 1x Cappuccino Extra Hot Extra Choc - this will not accumulate).
Note that if a double of the same Item is entered on the same seat, but its instructions are entered in a different order, the item will not accumulate, even if the 'With Instructions' option is enabled.
By default the option Use Instruction Separator Line will be selected.
When selected (default) the docket will print a line between the two seat options.
When not selected, the line will not print and rely on the seat definitions to display the different orders.
Items will print by Print Group while accumulating the main menu item.
Seat Numbers will be allocated and used to group the instructions from the main menu item if they have been added during the sale.
Each instruction will be printed on a separate line from the others.
Items will print by Print Group while accumulating the main menu item.
Seat numbers will be allocated and used to group the instructions from the main menu item if they have been added during the sale.
The instructions will also print on the same line, one after the other.
Items will print by Print Group while accumulating the main menu item.
Seat numbers will be allocated and used to group the instructions from the main menu item if they have been added during the sale.
All instruction items will print in a smaller font than the main item.
Items will print by Print Group while accumulating the main menu item.
Seat numbers will be allocated and used to group the instructions from the main menu item if they have been added during the sale.
Instruction items will print red.
Items will print by Print Group while accumulating the main menu item.
Seat numbers will be allocated and used to group the instructions from the main menu item if they have been added during the sale.
Instructions will print white text with black background. Only works on supported printers.
Items will print by Print Group while accumulating the main menu item.
Seat numbers will be allocated and used to group the instructions from the main menu item if they have been added during the sale.
All instruction items will print in a smaller font than the main item and in red.
Items will print Standard while accumulating the main menu item.
Seat numbers will be allocated and used to group the instructions from the main menu item if they have been added during the sale.
All instruction items will print in a smaller font than the main item and in red.
This option will use a Course Separator consisting of 20x equal signs (=) instead of using the Print Group name separator to separate each Print Group on the Kitchen Docket.
This function will also affect Kitchen Dockets printed as a result of sending orders to a table from Pocket Pad/Ideal Handheld.
Note that when toggling this option on/off, Idealpos will need to be restarted for the change to affect Pocket Pad/Ideal Handheld.
To demonstrate how this function affects the Kitchen Docket, a set of Stock Items from two different Print Groups were saved to a table and the resulting Kitchen Docket was saved.
This was done while the option "Use Course Separator instead of Print Groups" was enabled, and again while the same option was disabled.
Use Course Separator instead of Print Groups - Enabled
Use Course Separator instead of Print Groups - Disabled
This option is available for these Print Formats - Order By Print Group, Order by Seat/Print Group, Order by Print Group/Seat, Group Instructions by Seat.
When this option is enabled with the "All Items" option selected, this option will print the entire order that was placed to all Kitchen Printers that have been triggered.
For example, there are four separate Kitchen Printers; Mains, Pizza, Pasta and Bar.
There are four items in these Sales Categories; Main [Food Sales Category], Pizza [Food Sales Category], Pasta [Food Sales Category], Beer [Beverage Sales Category].
Example 1: An order is placed that only contains a Pizza - Only the Pizza will print to the Pizza Printer.
Example 2: An order is placed that contains a Pizza and Pasta - Pizza and Pasta will print to the Pizza Printer and Pasta Printer
Example 3: An order is placed that contains a Pizza, Pasta and Main - Pizza, Pasta and Main will print to the Mains Printer, Pizza Printer and Pasta Printer
Example 4: An order is placed that contains a Pizza, Pasta, Main and Beer - Pizza, Pasta, Main and Beer will print to the Mains Printer, Pizza Printer, Pasta Printer and Bar Printer.
To prevent Food Items from being printed to the Bar Printer, the "Food" Sales Category can be selected.
When the "Food" Sales Category is selected, the system will behave the same way as described in the examples above with the exception of example 4.
Example 4 when Sales Category is set to "Food" (order is placed that contains a Pizza, Pasta, Main and Beer) - Pizza, Pasta and Main will print to the Mains Printer, Pizza Printer and Pasta Printer. The Beer item will only print to the Bar Printer.
It will print all other options selected (as detailed previously) to all printers when triggered.
Note!
The "Print Entire Order to triggered Kitchen Printers" setting does not include Ideal Kitchen Monitor printers.
Will print all the items from the table in the order they were entered into the POS.
This will separate the items between the different Print Groups within your database.
This will separate the items between the different Print Groups within your database, but accumulate the same items.
This will separate each items into the relevant Seat number.
It will then group the items based on their print group within those seats.
This will separate each items into the relevant Seat number and accumulate the items between each seat.
It will then group the items based on their print group within those seats.
This will separate the items into the specific Print Groups, and then details by Seat.
This will separate the items into the specific Print Groups, and then details by Seat with item accumulated.
This option is available for all types of Bill Format and will print discounts as white text on a black background.
This applies to % Item Discounts as well as % Sub Total Discounts.
The below examples show the Print Discounts White on Black enabled as well as disabled.
You now have the option of selecting where the Print Group Header will be printed, and how it can be displayed.
There are numerous combinations available.
Go to Setup > Global Options > Printing > Print Group Header Format – Receipts/Bills.
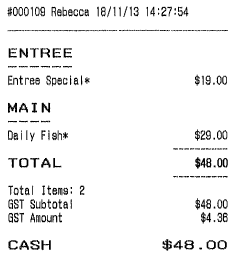
FIGURE 1-1:
|
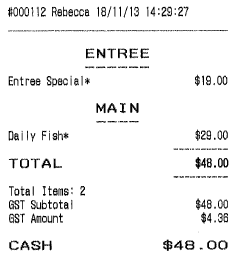
FIGURE 1-2:
|
|---|
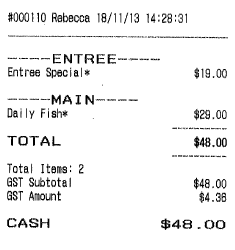
FIGURE 1-3:
|
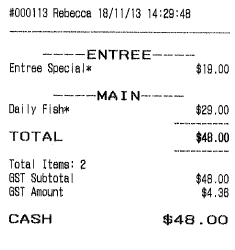
FIGURE 1-4:
|
|---|
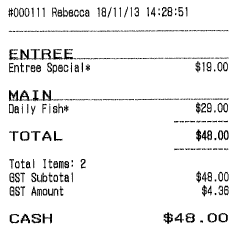
FIGURE 1-5:
|
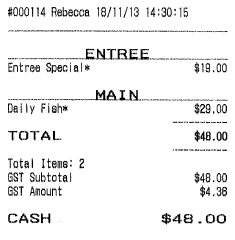
FIGURE 1-6:
|
|---|
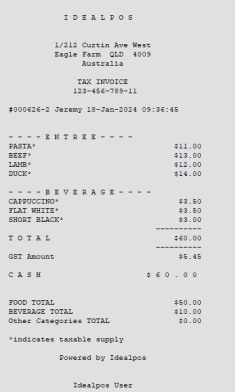
FIGURE 1-7:
|
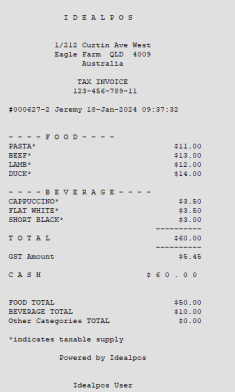
FIGURE 1-8:
|
|---|
QR Codes can be generated to print on Receipts and Coupons.
In both instances the code will be printed on the footer section of the docket.
The QR Code can be configured in up to 8 different size variations and you can enter text underneath to inform the user what the QR Code will do.
Go to Setup > Global Options > Printing > QR Codes.
Print on Coupons
Check this box to print the QR Code when a coupon is issued.
Print on Receipt Footer
Check this box to print the QR Code on the footer of a receipt. All terminals within a Site will print the QR Code on the footer if they have a receipt printer configured for use.
Print on A4 Tax Invoice
Check this box to print the QR Code at the bottom of your A4 Tax Invoices. A4 Tax Invoices can be produced automatically when either of these Yes/No Options are enabled - "Automatically Print A4 Invoice after each sale" or "Print A4 Invoices only for Customer Sales". A4 Tax Invoices can also be manually produced by going to: Back Office > Enquiry > Journal History > Select a Journal from the list > Tax Invoice button (located on the left-hand side of the Journal History Enquiry window).
QR Code Size
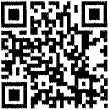
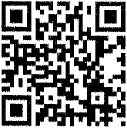
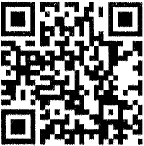
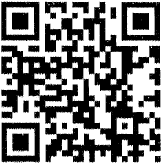
Select a size for the QR Code to print.
Idealpos supports sizes 2-9 with a recommendation of 5.
This setting is only used for standard receipt printing and does not affect the QR Code size that is printed on A4 Tax Invoices.


Receipt QR Code Data
Enter the details of what the QR Code will action when scanned.
This field can contain a link to a website.
You can also include tags which will be substituted with the corresponding data that is relevant to the sale.
When including tags in the Receipt QR Code Data field, ensure that you enter the tag text exactly as shown in the below examples with the square brackets surrounding the tag.
[DATE] - This will embed the date of the sale into the QR Code. The date format used will be DD MMM YYYY HH:MM:SS. E.g. 01 Sep 2021 15:53:25.
[CUSTOMERCODE] - This will embed the Customer Code into the QR Code. Note that the Customer Code will only be included in the QR Code Data if you add a Customer at the time you complete the transaction. Including the Customer Code in the QR Code Data field may be useful in cases where you have a loyalty website and you want to pass the Customer Code through to your website when a customer scans the QR Code at the bottom of their receipt.
E.g. https://www.customerloyaltyprogram.com/[CUSTOMERCODE]. Your loyalty website will need to have support implemented in order to support passing the Customer Code through to your site.
[CUSTOMERNAME] - This will embed the Customer Name into the QR Code. The Customer Name will only be included in the QR Code Data if you add a Customer at the time you complete the transaction. Similar to the Customer Code tag described above, the Customer Name function may be useful to pass through to your loyalty website. The Customer Name tag can be used together with the Customer Code tag. An example where the Customer Name may be useful could be when the customer scans the QR Code, the Customer Code and Customer Name are passed through to your loyalty website URL, enabling the Customer Code and Customer Name to be pre-filled into a registration form or a competition form. Your loyalty website will need to have this sort of functionality built-in to handle such data being passed to it within the URL.
[TAX] - This will embed the Tax amount for the sale into the QR Code.
[AMOUNT] - This will embed the total amount for the sale into the QR Code.
[ddMMyy] - This will embed the date into the QR Code. The date used will be the short format of ddMMyy. E.g. 010921, where dd is the day of the month, mm is the month number and yy is the year.
[INV] - This will embed the Invoice Number into the QR Code. E.g. 000731-2. This is essentially the Audit Number and POS Terminal number which performed the sale (as shown in the Journal History Enquiry).
Text underneath Code
These fields allow you to print a line with information about the code and accept up to 40 characters each.
QR Codes will work on most printers that emulate ESC/POS (Epson Emulation).
Check the specifications of your printer in the barcode section before attempting to configure this.
Saudi Arabia - QR Codes on Arabic Receipts
QR Codes can be printed on Arabic Receipts. Further details on setting up this function are available here.
This feature will allow customers to see how much they have saved when using Item Discount, Subtotal Discount, Promotions and Coupons.
If the customer is a member of the database and linked to the sale, it will display all discounted savings of all their linked transactions.
Go to Setup > Global Options > Printing > Show Total Discounts on Receipt.
Select if you want to display the discounts saved for This Sale, Customer’s Lifetime or both.
Go to Setup > Global Options > Customer > User-Defined Text Fields to enter the text you want to use on the receipts.
The discount savings will display at the bottom of the customer receipt.
Standard Sale Example:
Customer Sale Example:
Savings are saved into the journal so if a docket is printed at a future time it is printed.
These options can affect the size of the print on the kitchen printers and receipt.
Use Smallest Line Spacing
This option will ensure that the receipt as concise.
Kitchen Printer Large Size Format
Select from a combination of Double Height, Double Width and Bold.
Arabic Print Style, Use Windows Driver & Set Font to Bold
These settings are only available when the region ‘Saudi Arabia’ has been selected.
They provide the ability for custom printing settings specific to that region.
Order Number/Table Number/Web Order
The dropdown box contains options for each type of Kitchen Docket Header: Order Number, Table Number or Web Order.
This functionality enables Custom Kitchen Docket Headers to be configured (Custom Descriptor, Wrap Characters, Number of Empty Lines, Left-Aligned/Centred).
Each of those options (Descriptor, Wrap Characters, Number of Empty Lines and Alignment) are specific to the Kitchen Docket Type.
This enables each Kitchen Docket Header/Type to be configured differently as required.
E.g. Table Number can be configured to be Centred with Wrap Characters, while Order Number can be configured to be Left-Aligned without Wrap Characters.
Kitchen Docket Headers will vary depending on what type of print job is printed to the Kitchen.
E.g. When using the default values, Kitchen Docket Headers will print as follows:
The default Descriptors and values are listed below; these can be customised to suit the requirements of the venue:
| Kitchen Docket Type | Descriptor | Wrap Characters | Empty Lines | Alignment |
| Order Number | ORDER | * | 1 | Centred |
| Table Number | TABLE | 0 | Left-Aligned | |
| Web Order | WEB ORDER | 1 | Centred |
To customise the Kitchen Docket Header, select the Type: Order Number, Table Number or Web Order
Tip!
If required, the Web Order Number can be hidden.
This can be achieved via the creation of a User-Defined Option.
Go to: Back Office > Setup > POS Terminals > Select a POS Terminal > Modify > POS Settings Tab > Creating the following User-Defined Option:
Customer Receipt Footer
This field can be used to configure a Receipt Footer that will only be printed on the receipt footer when a Customer has been added to the sale.
This field also supports a variety of tags/variables (listed below), and when used, these tags/variables will be substituted with the relevant details on the Customer's Receipt.
The Customer Receipt Footer supports the following tags/variables (when using a tag/variable, ensure that the square brackets surrounding it are included in the Customer Receipt Footer):
[CUSTOMERNAME] - This will be replaced with the Customer's Name.
[DATE] - This will be replaced with the current date.
[ddMMyy] - This will be replaced with the date using the format of ddMMyy. E.g. If today is the 13th February 2024, the date will appear as 130224.
[CUSTOMERCODE] - This will be replaced with the Customer's Code.
[CUSTOMERSCANCODE] - This will be replaced with the Customer's Scan Code.
[TAX] - This will be replaced with the Tax amount for the sale.
[AMOUNT] - This will be replaced with the sale amount.
[INV] - This will be replaced with the Invoice Number (note that the Invoice Number also appears at the top of the Receipt).
The Customer Receipt Footer example shown further below was produced when the Customer Receipt Footer field was populated with the following content:
Date: [DATE]
Customer Code: [CUSTOMERCODE]
Customer Scan Code: [CUSTOMERSCANCODE]
Customer Name: [CUSTOMERNAME]
Tax: [TAX]
Amount: [AMOUNT]
Date: [DATE]
Short Date: [ddMMyy]
Invoice No: [INV]
Member Photo on IKM Runner Dockets
This option will print the eBet image on the Kitchen Monitor runner docket.
Be aware that the printer is a receipt printer that prints in black and white only, so the quality of the image printed may differ greatly from any colour image that it is supposed to represent.