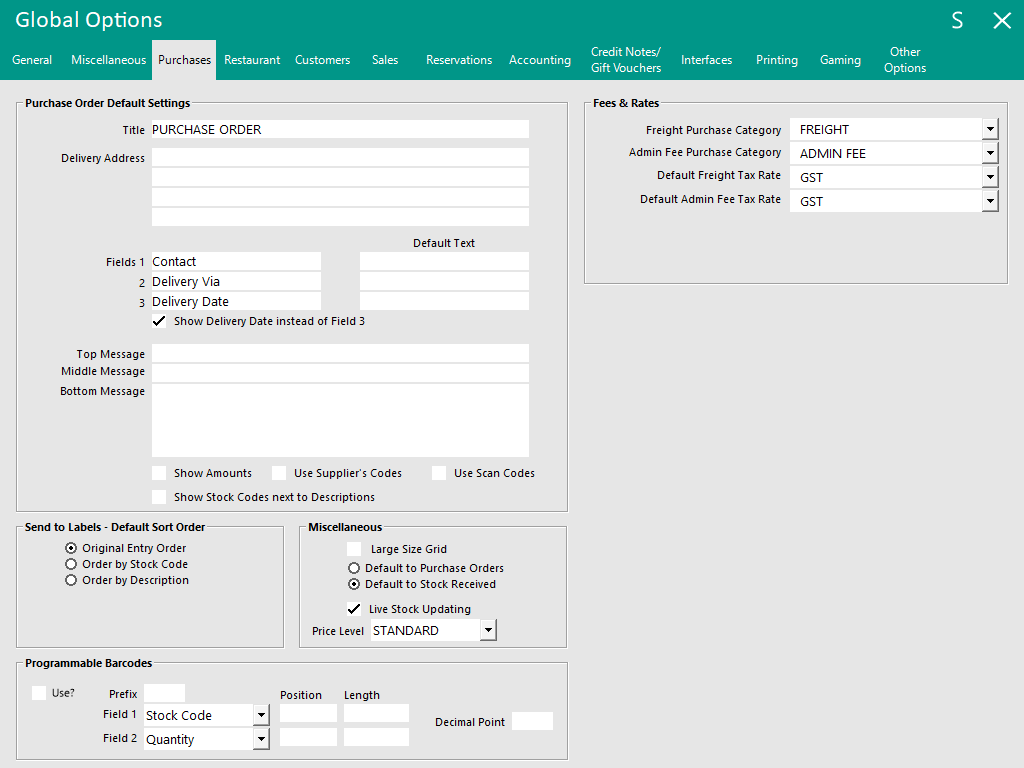
The Purchases Tab is broken up into six different sections which are:
Note!
Any changes to these settings will not affect existing Stock Purchases.
The settings that are configured will only apply to new Stock Purchases that are created.
E.g. If a Stock Purchase is created when the Show Amounts option is unticked, that Stock Purchase will always have the Show Amounts hidden, regardless if the 'Show Amounts' option is enabled.
Title - This field is what is printed at the top of the Purchase Order to let the suppliers know you are sending an order.
Delivery Address - Your address details of where you would like the items delivered. There are four available fields that can be used to populate an address.
Fields 1, 2, 3 - These fields give the supplier extra details that are the same for each Purchase Order.
Fields 1, 2, 3 (Default Text) - These fields can be used to specify the Default Text that will be entered into Fields 1, 2 and 3.
Top Message - This allows you to enter a message at the top of the Purchase Order.
Middle Message - This allows you to enter a message in the middle of the Purchase Order.
Bottom Message - This allows you to enter a message at the bottom of the Purchase Order.
Show Amounts - This allows you to display the Unit Costs that you expect to pay for your items.
Use Supplier's Codes - This allows you to use the Supplier Codes that are on the Suppliers items. You can't have this option enabled with Use Scan Codes.
Use Scan Codes - This allows you to scan items into a Purchase Order. You can't have this option enabled with Use Supplier's Codes.
Show Stock Codes next to Descriptions - This allows you to show the Stock Item Stock Codes next to the Stock Item Descriptions on the Purchase Order.
Example of a Purchase Order:
When this checkbox is selected, it will add more space between the lines within the Purchase Orders’ Items.
This is to enable better access when used from a Touchscreen.
When the Stock Purchases function is accessed via Transactions > Stock Control > Stock Purchases and the 'Add' button is pressed, these default settings will apply.
The 'Live Stock Updating' checkbox enables the ability to display and modify each Stock Item's Department and Sell Price in a Stock Purchase/Stock Receive (via Transactions > Stock Control > Stock Purchases > Add/Modify).
The Price Level dropdown box enables the selection of the Price Level which will be used for the Live Stock Updating function.
Any changes to a Stock Item's Department and/or Sell Price will be replicated immediately to all networked POS Terminals.
Any changes to a Stock Item's Sell Price will be reflected in the Price Changes Report (Reports > Stock Control > Price Changes).
Further details about the Live Stock Updating function are available in the Stock Purchases or Stock Received topics.
Programmable Barcodes are also outlined in the Ishida Uni 5 Interface topic.
Use? - Enable the checkbox to use the Programmable Barcodes function.
Prefix – All barcodes starting with this prefix will be considered as a programmable barcode.
Field 1 – Choose either Stock Code or Department Code.
Field 2 – Choose either Price or Qty.
Position Fields – Enter the starting position for Field 1 & 2.
Length Fields – Enter the length of the fields for Field 1 & 2.
Decimal Point – Enter the decimal point position when using Price for Field 2.
When processing invoices from Suppliers, they may charge you additional fees to the items that you have ordered to have the stock delivered to you.
You may need to create a Purchase Category to accommodate these charges.
Go to File > Purchases > Purchase Categories > Add.
You also have the ability to define the tax rates charged against these categories.
The rates are defined on the Sales tab of Global Options.
This section will only appear when the Head Office module is enabled in the Licence Gateway.
This section is outlined in further detail within the Inter-Store Ordering - Head Office - Settings topic.