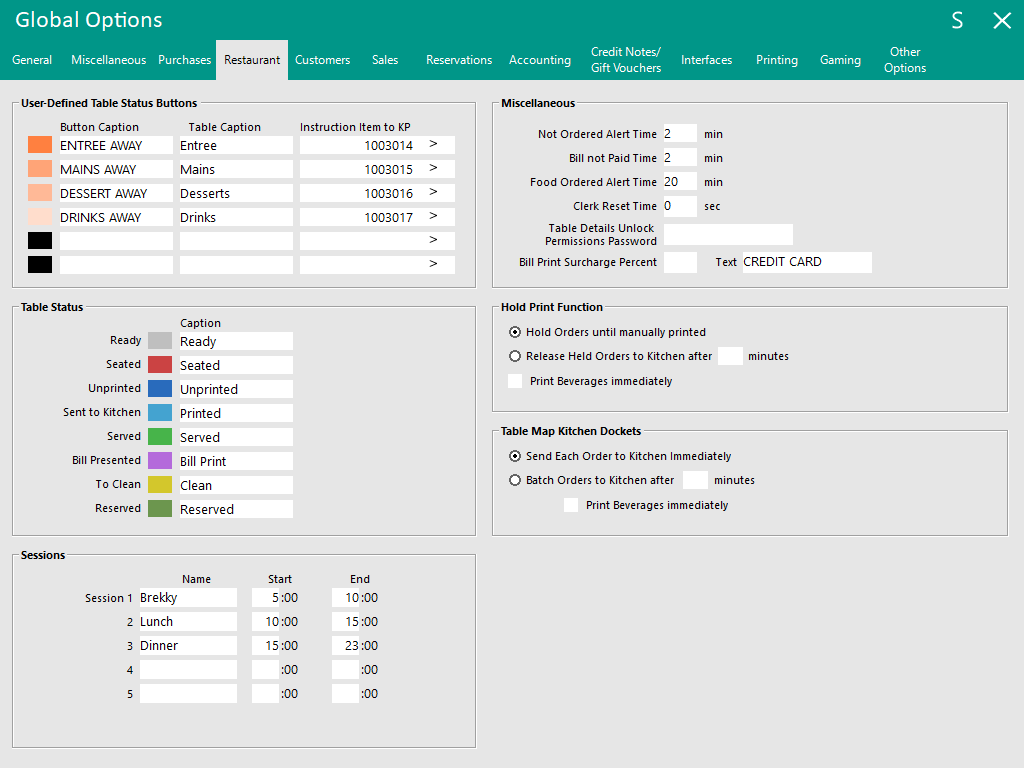
The Restaurant Tab is available via Back Office > Setup > Global Options > Restaurant, and is broken up into six different sections which are:
It is possible to use custom names and colours for the status buttons to send notices to the kitchen to call tables away throughout the different courses.
Each item needs to be added as a stock item and be ticked as an instruction.
Once these have been set, the buttons will display at the bottom of the Table Map.
These options are provided to indicate the different area of service that the table is currently getting.
The Caption text will be displayed on the table underneath the table number.
If you don’t want to see the text, leave this field blank.
Ready -Indicates the table is able to be used.
Seated -Indicates the guest has occupied the table and is yet to order.
Unprinted -If you are holding print jobs to the kitchen, this will display that it is yet to be sent to the kitchen. Holding Print Jobs to the Kitchen is outlined in further detail by clicking here.
Printed-Indicates that the items have been sent to the kitchen printers.
Served-Indicates that a course has been delivered to the table.
Bill Presented -Indicates staff member has printed a bill on this table and is awaiting payment.
To Clean -Indicates the table has been paid and has yet to be cleaned and ready for next service.
Reserved -Indicates that a reservation has been placed on the table for the service.
The colours will display as each function is used.
A table can only have one status at a time; when a new status is selected for a table, it will replace the table's previous status.
The time settings can vary the way you service the guests in the restaurant, and provide visual alerts to enable staff to react quickly.
There are 6 separate settings that can be applied as outlined below.
This is set in minutes and will start to flash on the table when a guest has been seated and not ordered anything within the specified time. It helps to ensure orders have been taken and all guests are served promptly.
Once you have presented the Bill Print to the customer, the table will flash after the set time to ensure that you are paid, and the guests haven’t left.
This time is set to ensure that each course has arrived at the table within an appropriate time period. As each course is called away, the timer will reset for the next course.
When you require a clerk entry on the Table Map, this function will lock the clerk out to ensure that a guest cannot use the terminal if the clerk has walked away for an extended period.
This is used when a Clerk with restricted access is signed in and you want to allow a Supervisor or Manager to temporarily unlock the Table Details screen.
Enter a Password into the Table Details Unlock Permissions Password.
To use this function while a Clerk with restricted Table Map access is signed in, press the 'Table Details' button, press the 'Unlock Permissions' button, then enter the password configured in this screen.
The Permissions will be temporarily unlocked for the Table Details screen.
Upon closing the Table Details screen, the Permissions will return to a locked state.
This is used to show a surcharge percent at the bottom of a bill when printing a bill from the Table Map screen.
The Bill Print Surcharge Percent will be displayed at the bottom of a bill as "Pay By CREDIT CARD (Percent%)" along with the total amount due including the surcharge percent.
"CREDIT CARD" and "Percent" will be substituted with the values configured in the Bill Print Surcharge Percent and Text fields.
When the Bill Print Surcharge Percent value is blank, the Bill Print Surcharge Percent and Text will not be included at the bottom of the bill.
If a value has been entered into the Bill Print Surcharge Percent, the bill will include the Bill Print Surcharge text and percent at the bottom of the bill.
Note that this feature does not add a surcharge onto the final amount due; it is simply used as a method of displaying a surcharge on the bill for the customer so they're aware of how much they will be charged should they choose to pay for their bill using the selected payment method.
This feature is useful for customers who have the same surcharge configured for multiple cards but only want a single surcharge listed on their bills.
This section contains the following options which will be used for printing Kitchen Dockets with the Hold Print Function:
This section contains the following options which will be used for printing Kitchen Dockets with the Table Map function: