Open topic with navigation
You are here: Labels > Stock Item Labels
Stock Item Labels
Introduction
This topic outlines the various options available within the Stock Items Label window when using the Data Type "Stock Items".
Additional functionality is also available and outlined on this page.
Click on the required link to find out more about the available functionality.
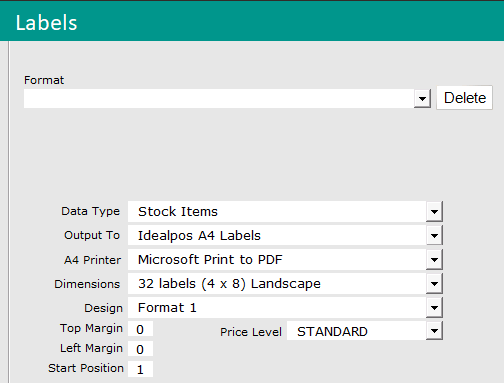
General Overview
Format: Select from a pre-saved format to use for the label selection. As mentioned in the 'Save Format As' point further below, the list of Formats displayed in this list are specific to the POS Terminal/Back Office on which they're saved. E.g. When saving a Format on a Back Office or POS Terminal that saved format will only be available on the Back Office or POS Terminal on which it was saved.
Data Type: Select Stock Items from the drop-down menu.
Output To: Select how you want the labels. Idealpos A4 Labels, Idealpos Continuous Labels, DesignPro, Text or Labeljoy.
A4 Printer: When using Idealpos A4 Labels, you can select which A4 printer is available that you will use.
Continuous Printer: When using Idealpos Continuous Labels, you can select which Continuous Printer you will use.
Dimensions: Select which label you want to use from the drop-down menu.
Design: Select a design from the drop-down menu.
Top Margin: Use this field to adjust the label to print correctly on the page.
Left Margin: Use this field to adjust the label to print correctly on the page.
Start Position: Use this option to set which position the labels from the current selection will print from.
Price Level: Select which price level will be used to print the selling price of the items.
Override Font Name: Select the Font Name to use for the Stock Item Labels. This option is only available when "Idealpos A4 Labels" have been selected in the "Output To" dropdown box. When no font name is selected, Idealpos will use the default Font Name.
Use Stock Code as Barcode: When this option is unchecked, the Stock Item Scan Code will be used as the Barcode on the printed labels. When this option is checked, the Stock Item Scan Code will be used as the Barcode on the printed labels
Show Print Dialog Box: When this option is enabled, pressing the 'Print' button will display the Windows Print Dialog box before labels are printed to the printer. The Print Dialog box displays a list of printers, the Page Range, Number of Copies, etc. The Print Dialog box also gives the opportunity to press 'Cancel' in case you want to back out of printing labels.
Long Descriptions: This option is available when the Output To is set as "Idealpos A4 Labels" or "Idealpos Continuous Labels". This option will use the Long Description (Description 3) when printing Stock Item Labels. Note that depending on how long the description is, it may not fit on the Label and will therefore be cut off or overlap other elements of the label. When using Idealpos A4 Labels, the "Preview" option can be used with the selected Dimensions and Design to get a visual representation on-screen before printing the labels onto physical stationery.
Hide Prices: This option will hide the Stock Item Sell Prices on the printed labels.
Barcode Type: If you are using a specific barcode type, select it here, otherwise just use the Auto setting.
Format File: This is the file created in Avery DesignPro which is used a template for all labels.
Data File: This is the file that Avery DesignPro reads to get details for printing on the labels.
Save Format As: Enter a name for the format you have created and save it for use as a default. It will then be available in the drop-down menu of the Format option. Note that saved formats are specific to the POS Terminal/Back Office on which they're saved. E.g. When saving a Format on a Back Office or POS Terminal, that saved format will only be available on the Back Office or POS Terminal on which it was saved.
The dimensions and designs will vary depending on the selection made in the Output To format.
 Click here to expand a detailed listing of each of the available options based on the Output To format selected.
| Output To
|
Printer Type
|
Dimensions
|
Design
|
Top Margin
|
Left Margin
|
Start Position
|
Price Level
|
Use Stock Code as Barcode
|
Show Print Dialog Box
|
Hide Prices
|
Barcode Type
|
Format File
|
Data File
|
| Idealpos A4 Labels |
A4 Printer |
22 labels (2x11) Portrait
|
Format 1
Format 2
|
Yes |
Yes |
Yes |
Yes |
Yes |
Yes |
Yes |
Auto
EAN 13
EAN 8
UPCE
UPCA
Code 128
Code 39
|
No |
No |
| Idealpos A4 Labels |
A4 Printer |
33 labels (3x11) Portrait
|
Format 1
Format 2
Format 3
|
Yes |
Yes |
Yes |
Yes |
Yes |
Yes |
Yes |
Auto
EAN 13
EAN 8
UPCE
UPCA
Code 128
Code 39
|
No |
No |
| Idealpos A4 Labels |
A4 Printer |
65 labels (5x13) Portrait
|
Format 1
Format 2
|
Yes |
Yes |
Yes |
Yes |
Yes |
Yes |
Yes |
Auto
EAN 13
EAN 8
UPCE
UPCA
Code 128
Code 39
|
No |
No |
| Idealpos A4 Labels |
A4 Printer |
24 labels (3x8) Landscape |
Format 1
Format 2
Format 3
|
Yes |
Yes |
Yes |
Yes |
Yes |
Yes |
Yes |
Auto
EAN 13
EAN 8
UPCE
UPCA
Code 128
Code 39
|
No |
No |
| Idealpos A4 Labels |
A4 Printer |
21 labels (3x7) Portrait |
Format 1 |
Yes |
Yes |
Yes |
Yes |
Yes |
Yes |
Yes |
Auto
EAN 13
EAN 8
UPCE
UPCA
Code 128
Code 39
|
No |
No |
| Idealpos A4 Labels |
A4 Printer |
20 labels (4x5) Landscape |
Format 1 |
Yes |
Yes |
Yes |
Yes |
Yes |
Yes |
Yes |
Auto
EAN 13
EAN 8
UPCE
UPCA
Code128
Code39
|
No |
No |
| Idealpos A4 Labels |
A4 Printer |
32 labels (4x8) Landscape |
Format 1 |
Yes |
Yes |
Yes |
Yes |
Yes |
Yes |
Yes |
Auto
EAN 13
EAN 8
UPCE
UPCA
Code128
Code39
|
No |
No |
| Idealpos A4 Labels |
A4 Printer |
Full Page Label (1x1) Portrait |
Format 1 |
Yes |
Yes |
Yes |
Yes |
Yes |
Yes |
Yes |
Auto
EAN 13
EAN 8
UPCE
UPCA
Code 128
Code 39
|
No |
No |
| Idealpos A4 Labels |
A4 Printer |
8 labels (4 x 2) Landscape |
Format 1 |
Yes |
Yes |
Yes |
Yes |
Yes |
Yes |
Yes |
Auto
EAN 13
EAN 8
UPCE
UPCA
Code 128
Code 39
|
No |
No |
| Idealpos Continuous Labels |
Continuous Printer |
40mm x 28mm |
Format 1 EPL
Format 2 EPL
Format 3 ZPL
|
No |
No |
Yes |
Yes |
Yes |
No |
Yes |
Auto
EAN 13
EAN 8
UPCE
UPCA
Code 128
|
No |
No |
| Idealpos Continuous Labels |
Continuous Printer |
35mm x 17mm |
Format 1 ZPL
Format 2 EPL
Format 3 EPL
|
No |
No |
Yes |
Yes |
Yes |
No |
Yes |
Auto
EAN 13
EAN 8
UPCE
UPCA
Code 128
|
No |
No |
| Idealpos Continuous Labels |
Continuous Printer |
56mm x 13mm |
Jewellery |
Yes |
Yes |
Yes |
Yes |
Yes |
No |
Yes |
Auto
EAN 13
EAN 8
UPCE
UPCA
Code 128
|
No |
No |
| Idealpos Continuous Labels |
Continuous Printer |
70mm x 25mm |
Shelf Labels
Shelf Labels Small Font
|
Yes |
Yes |
Yes |
Yes |
Yes |
No |
Yes |
Auto
EAN 13
EAN 8
UPCE
UPCA
Code 128
|
No |
No |
| DesignPro |
No |
No |
No |
No |
No |
No |
No |
No |
No |
No |
No |
Yes |
Yes |
| Text |
No |
No |
No |
No |
No |
No |
No |
No |
No |
No |
No |
Yes |
Yes |
| Labeljoy |
No |
No |
No |
No |
No |
No |
No |
No |
No |
No |
No |
Yes |
Yes |
Yes = Option is available for the selected Output, Dimensions and Design.
No = Option is unavailable for the selected Output, Dimensions and Design.
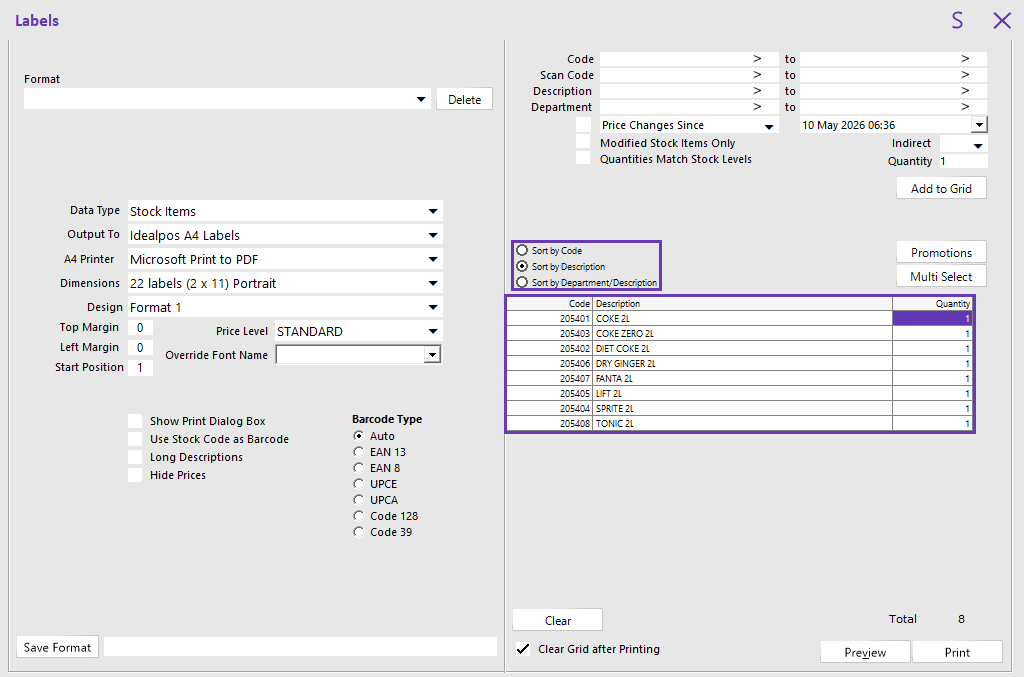
Sort by Code/Sort by Description/Sort by Department/Description
The Sort by option can be used to specify which order the Stock Items will be sorted by when they're added to the Labels grid.
The options available are:
- Sort by Code
- Sort by Description
- Sort by Department/Description
To use the Sort by functionality, the desired Sort by option must be selected prior to adding Stock Items to the Labels grid.
Changing the Sort by option after Stock Items have already been added to the Labels grid will not change their sort order.
Selecting which Stock Items to Print Labels
Within the Selection Range, you choose the Stock Items you wish to print.
You have a number of selections to choose from to print out the exact quantity of labels.
Each time you are selecting an item, or range of items, the Quantity field can be changed to print out the labels for the amount required.
You can print out the same amount of labels that are currently in stock (Quantities Match Stock Levels), or items where any field has been changed since the last label was printed (select Modified Stock Items Only).
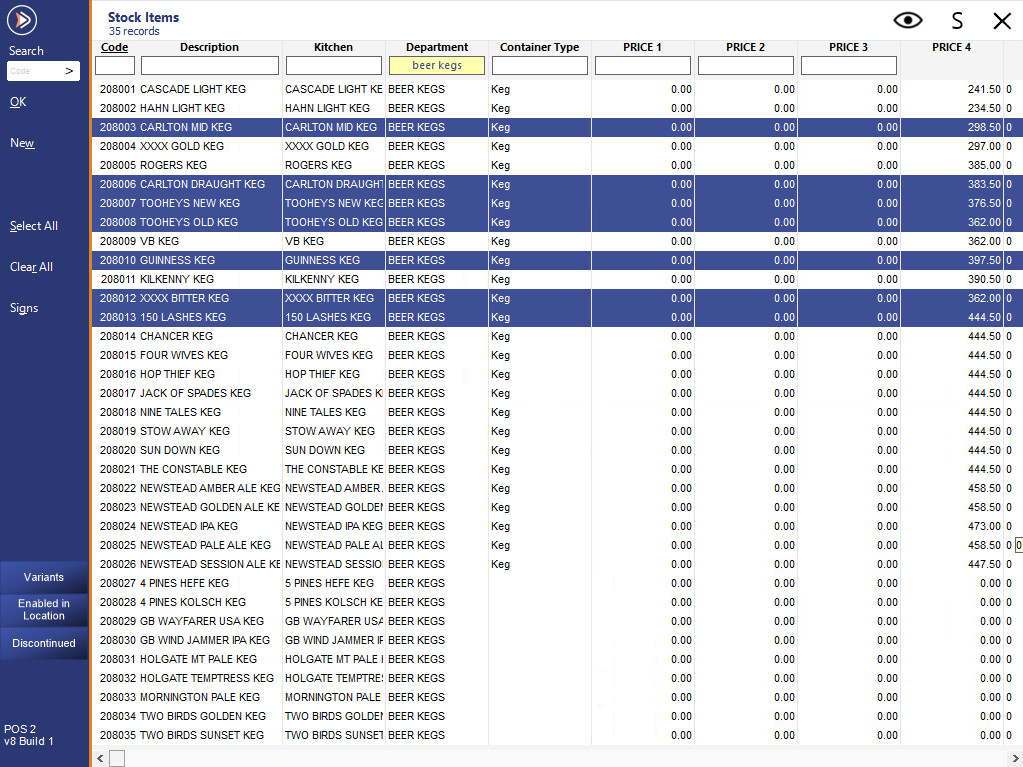
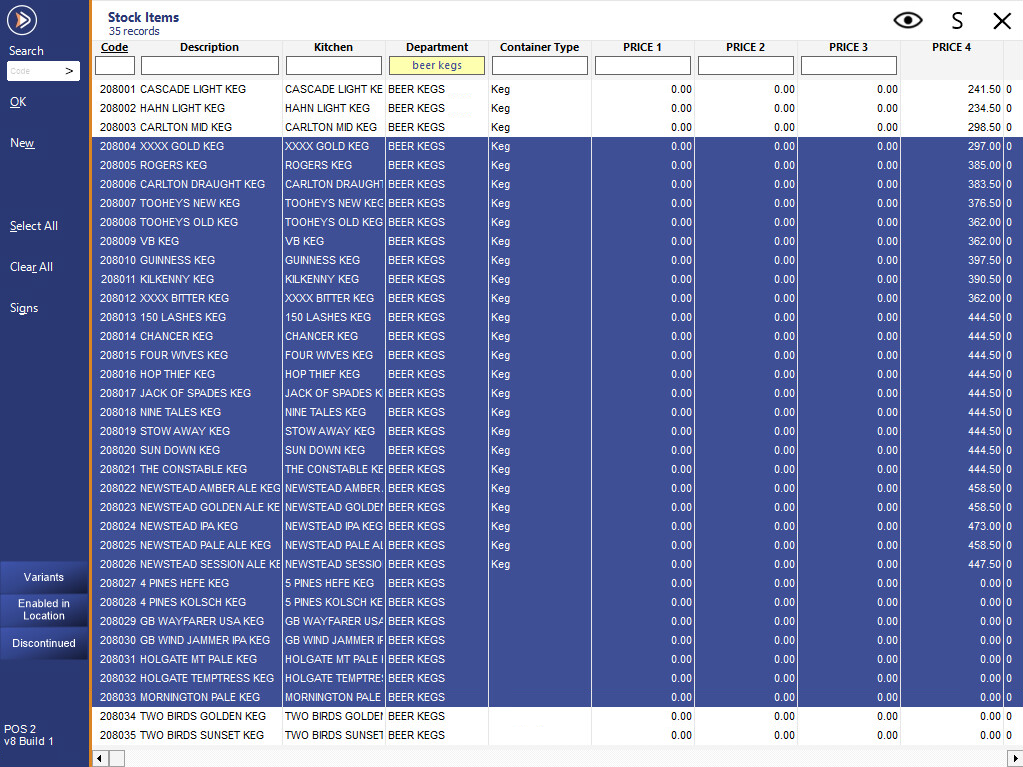
Stock Items can be added to labels using the multi-select feature.
When you press the Multi-Select button, you will be taken to the Stock Item list, where you can select multiple stock items before pressing ‘OK’.
All other stock item settings for label selection will be recognised.
For example, if you enter a Quantity of 7, all multi-selected items will be entered with a quantity of 7.
You can press the ‘Shift’ button to select a group within the selected range, otherwise, just select the items you have searched for and press ‘OK’.
Each time you select an item for a label and press Add to Grid, it will be added to the list.
When all the stock items you would like to print labels for have been added to the list, you can select a preview or print the labels direct.
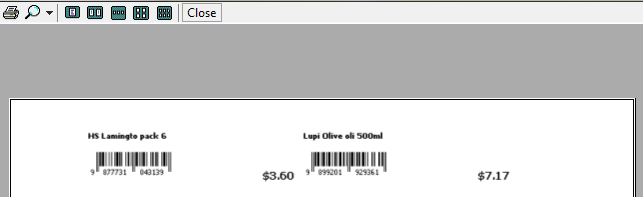
When you select to preview, the labels will display on screen as they will print on an A4 sheet.
Add Stock Items by Promotion
This functionality can be used to add Stock Items by Promotion to the Labels grid.
This functionality currently supports Promotions which have their Discount Type set to "Unit Price Each".
This is designed for Promotions which only have Stock Items in Trip Condition Set 1.
This is not designed for Promotions that require the purchase of Stock Items from multiple Trip Condition Sets.
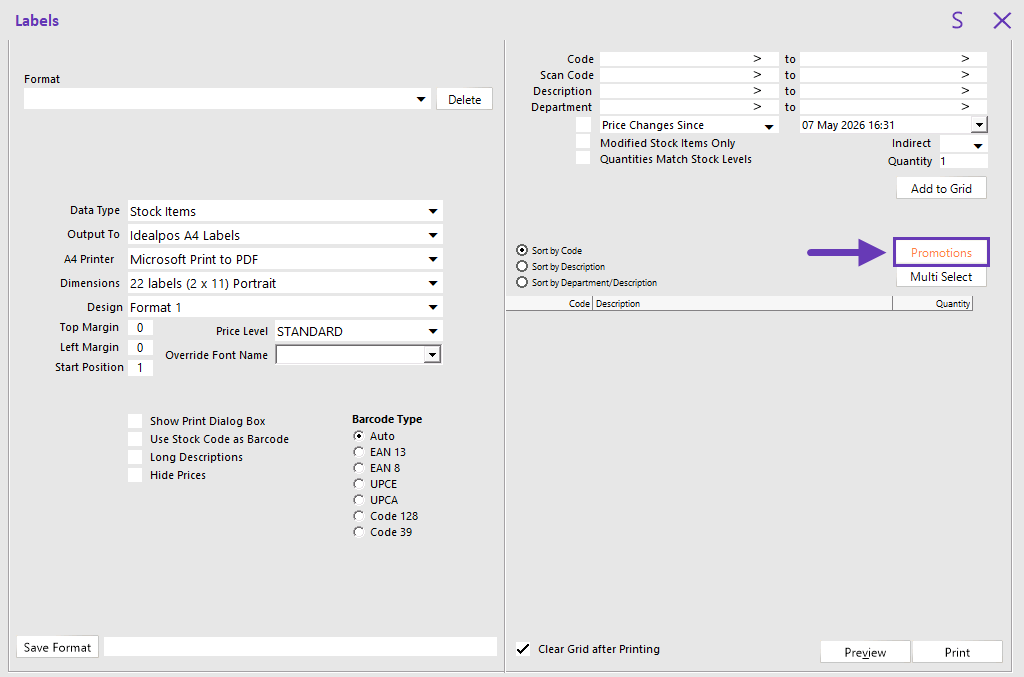
To use this functionality, press the "Promotions" button.
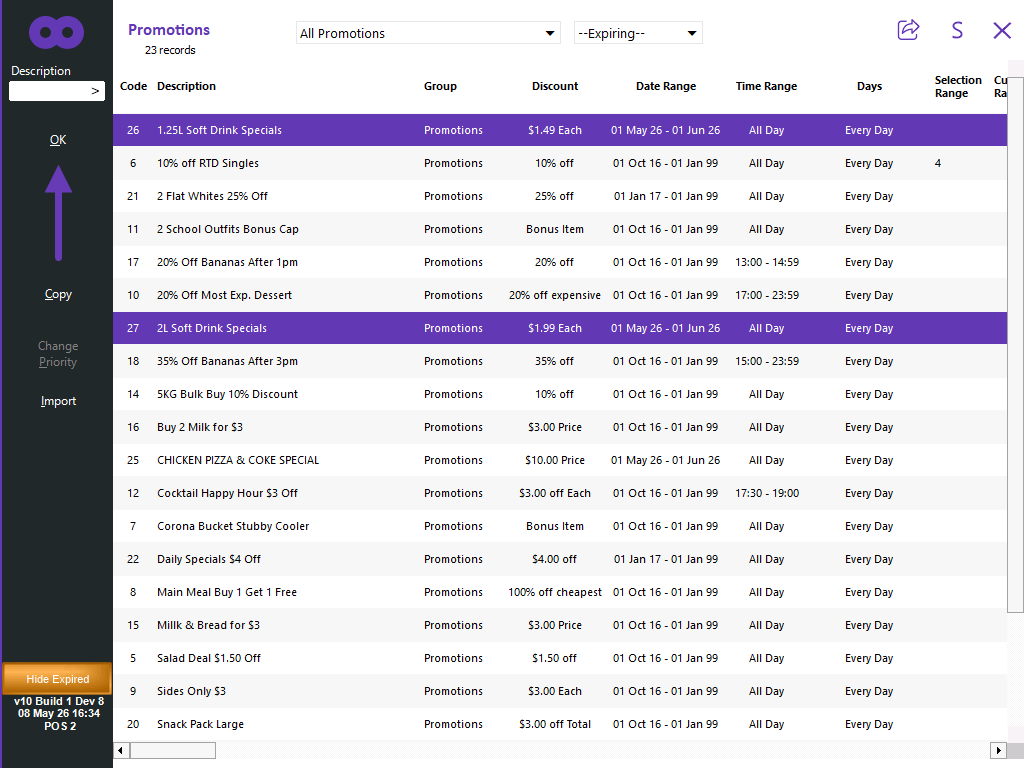
The Promotions window will be displayed.
One or more Promotions can be selected.
To select multiple Promotions, hold down CTRL + click on each required Promotion.
To select a range of Promotions, select the first Promotion, then hold down the Shift key and press the last Promotion in the range. All Promotions between the first and last Promotion will be selected.
Press the "OK" button on the top-left corner to add the Stock Items from the selected Promotions.
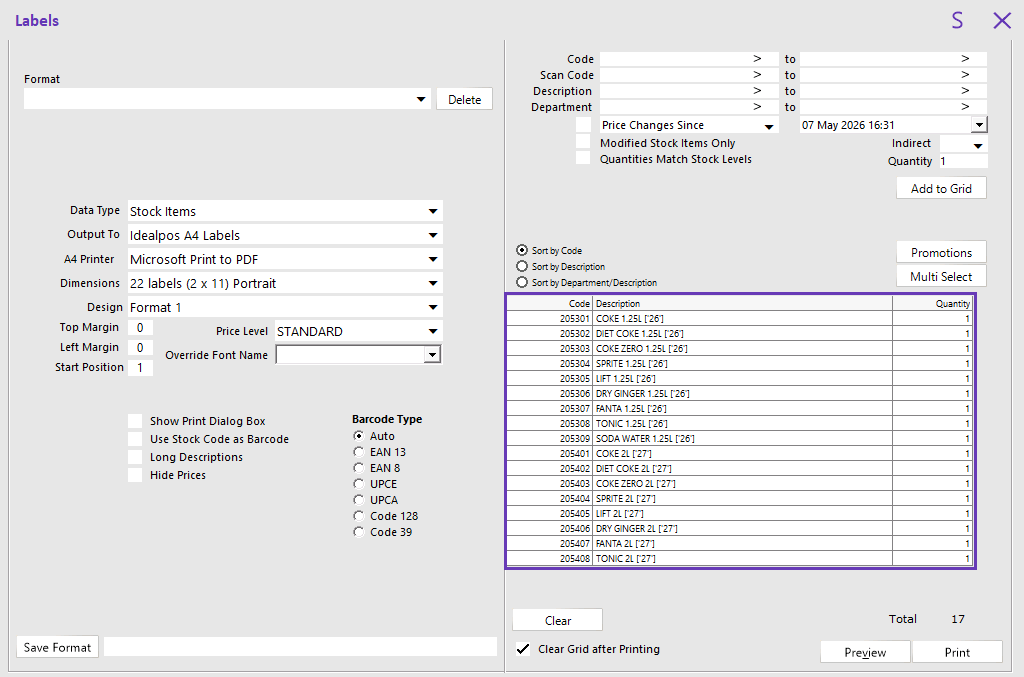
The Stock Items from the Trip Condition Set 1 of the selected Promotions will be added to the Labels window.
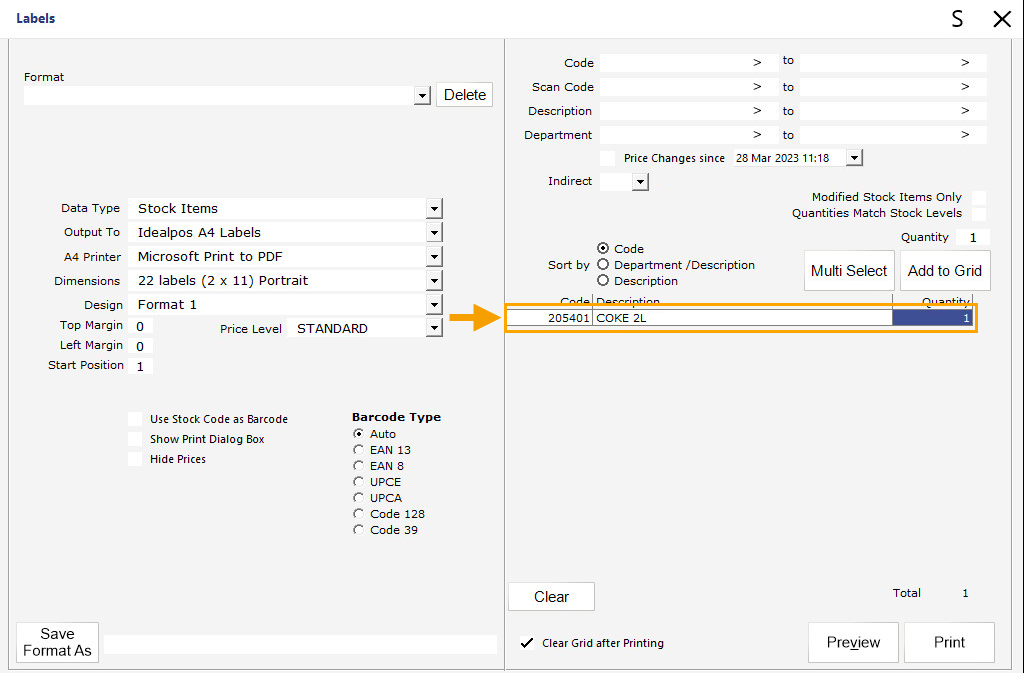
Fast entry of Stock Items into Labels
Stock Items can be quickly entered into the Labels window by clicking the cursor into the Code or Scan Code fields > Enter the required Code/Stock Code > Press ENTER on your keyboard.
The Stock Item will be added to the list of items which labels will be printed.
If you have a Wedge Barcode Scanner, you can also utilise it in a similar fashion by clicking the cursor into the Code or Scan Code field, then scan the barcode using your Wedge Barcode Scanner.
The Stock Item will be added to the list of items that a label will be printed.
Tip!
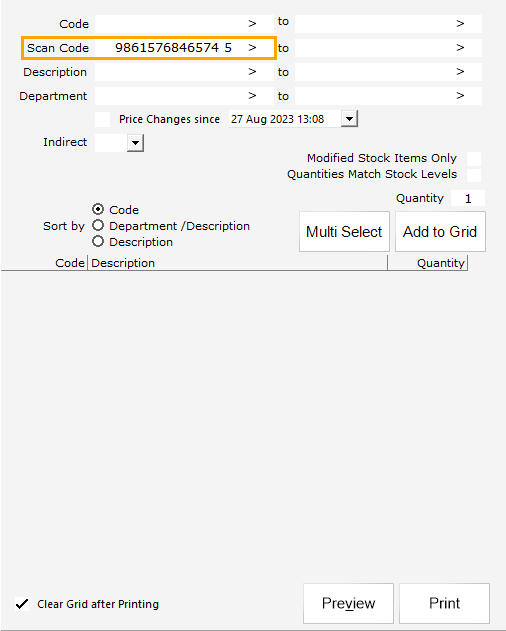
The label quantity can be entered for each item when entering the Stock Item Code or Stock Item Scan Code.
E.g. Type in the Stock Item Code or Stock Item Scan Code into the respective field, press SPACE, input the quantity required, press ENTER.
If 5 labels are required for COKE 2L (Scan Code 9861576846574), the data should be entered into the Scan Code field as follows:
9861576846574 5
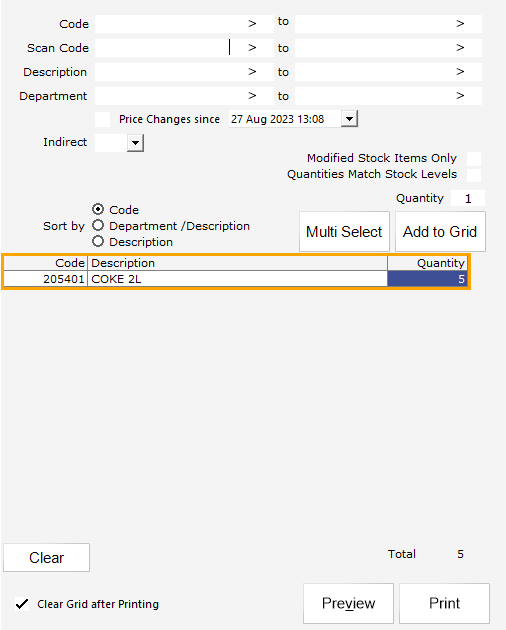
After the data is entered into the Scan Code field, press the ENTER button; the Stock Item will be added to the list of items in the label window using the quantity that was entered.
This label quantity function also enables Cipherlab 8200 Series devices to send label requests to the Idealpos Labels window.
When sending data from this type of device, ensure that the Labels window is visible and the cursor is placed into the Scan Code field, then send the data from the device.
The device will enter the items into Idealpos one at a time; the process will automatically press ENTER after each item, populating Idealpos Labels with the labels that have been requested from the device.
The data that the device sends should be in the format of:
[ScanCode][SPACE][Quantity][ENTER/CARRIAGE RETURN]
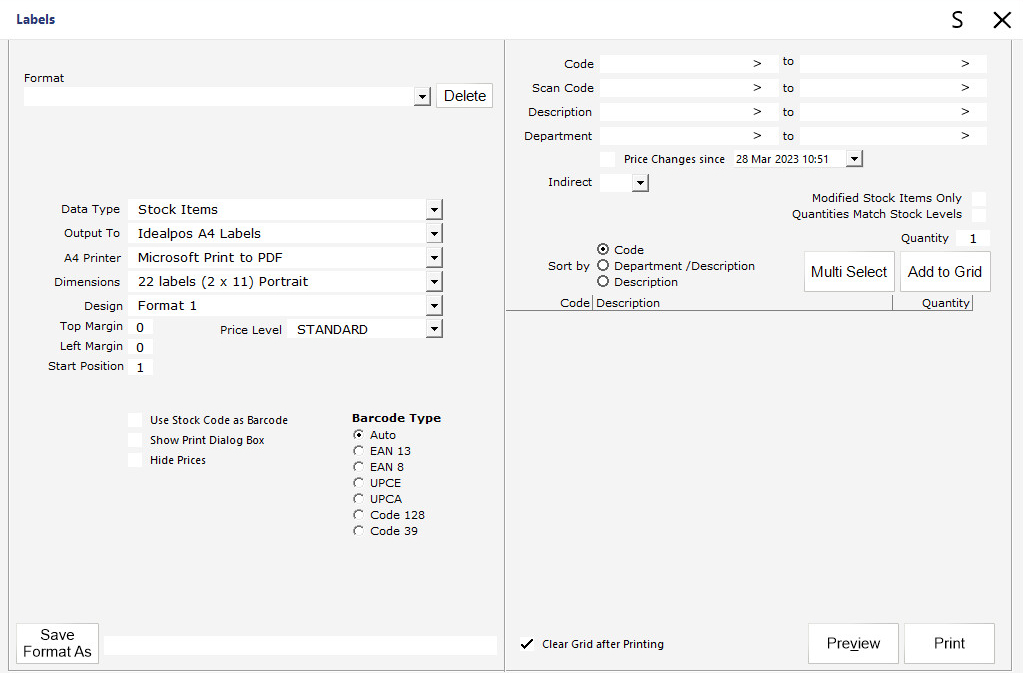
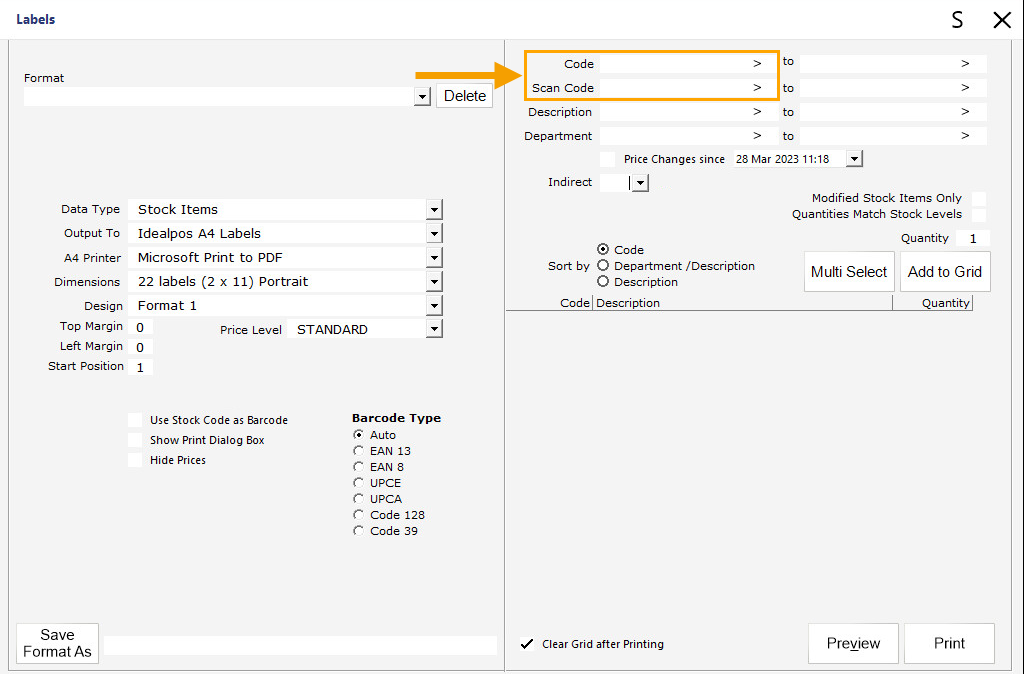
The below screenshot shows the fields which are enabled for fast entry:
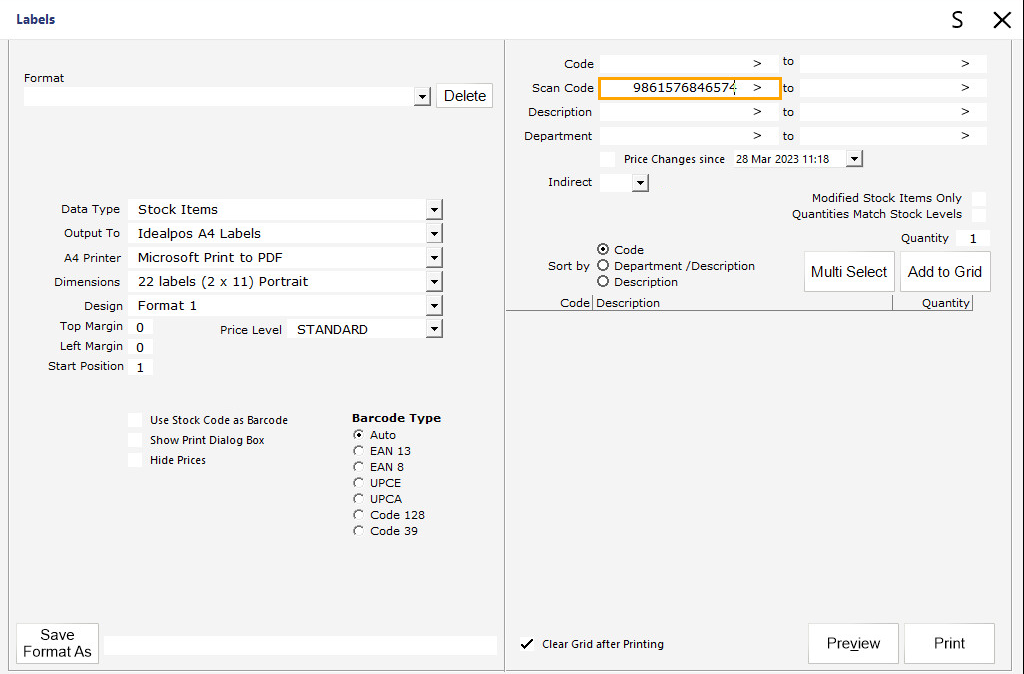
Enter the Scan Code
Press ENTER > The Stock Item is added to the list of items that will have a label printed.
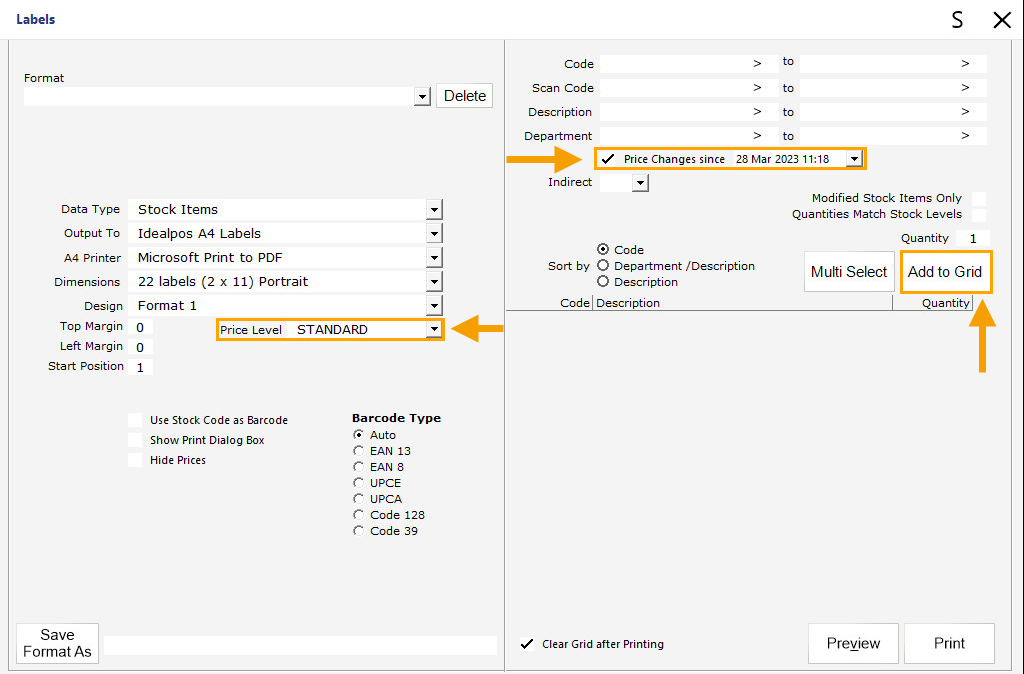
Price Changes since/Items Created Since [date/time]
Stock Items can be added to the Labels grid based on the Price Changes Since or Items Created Since [date/time].
To use this option, enable the checkbox next to the Price Changes Since/Items Created Since dropdown box.
Select the desired option (Price Changes Since or Items Created Since), enter a Date/Time, select a Price Level, then press the 'Add to Grid' button.
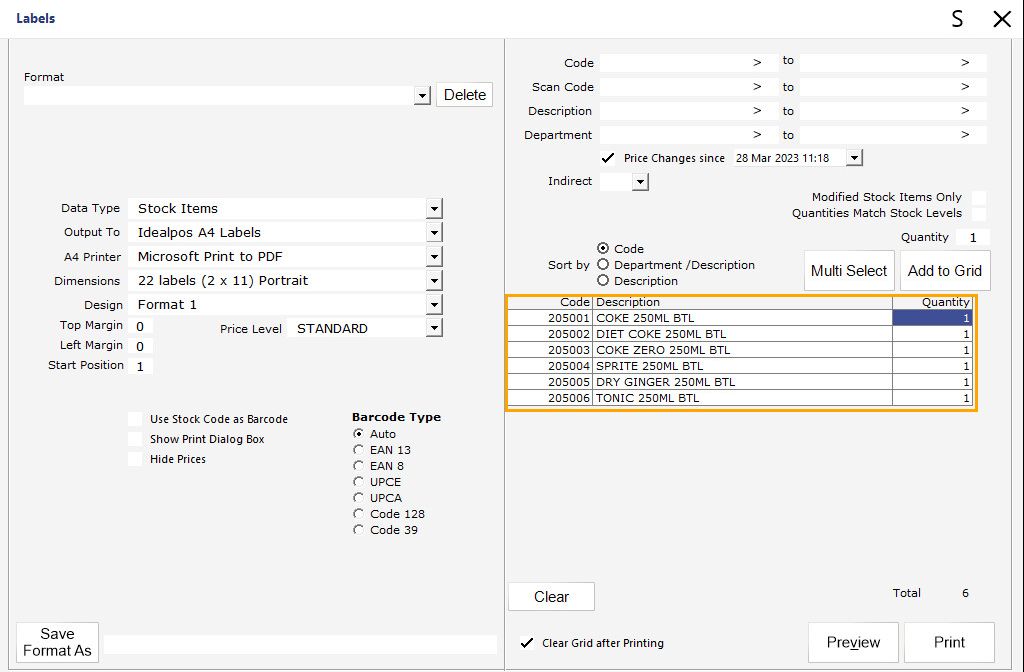
Price Changes Since or Items Created Since the entered date/time will be added to the grid.
If the Price Changes Since option was selected, any items that have had a Price Change Since the selected date/time for the selected Price Level will be added to the grid.
If the Items Created Since option was selected, any items that have been created since the selected date/time will be added to the grid.
If there have been no Price Changes for the selected Price Level since the period selected, an 'Item not found!' prompt will be displayed.
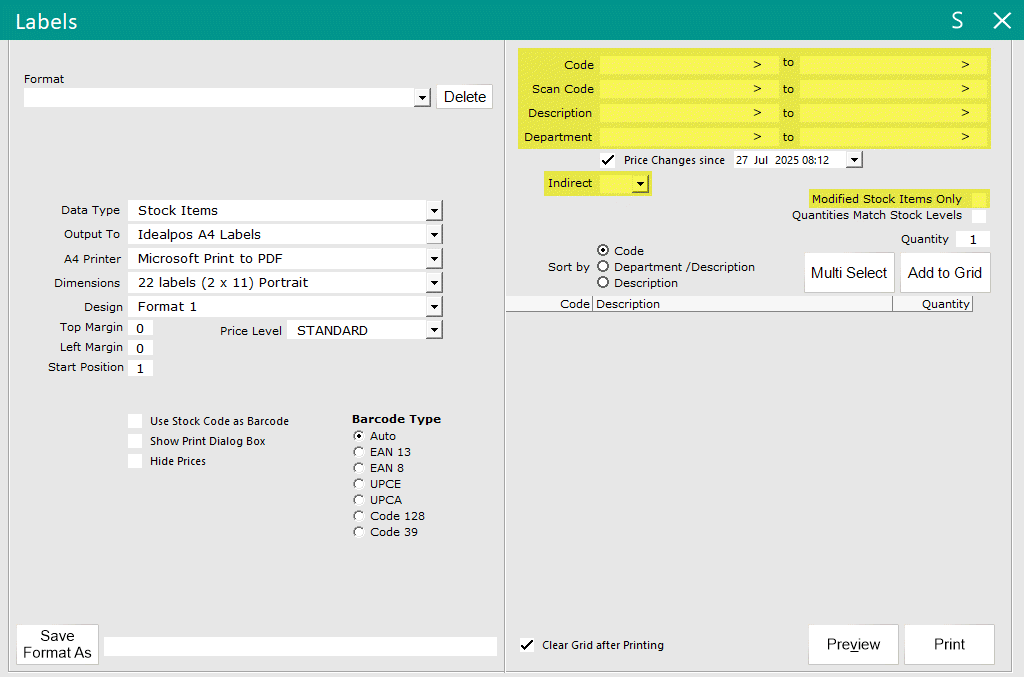
Note!
When the "Price Changes since" option is enabled, values entered in the following fields are ignored:
- Code
- Scan Code
- Description
- Department
- Indirect
- Modified Stock Items Only
The fields that are ignored are highlighted as shown below:
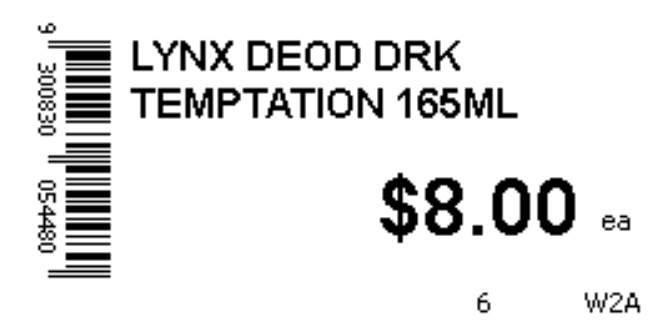
Metcash Fields supported on 20 labels (4x5) Landscape and 32 labels (4x8) Landscape Formats
In Idealpos v9 Build 11 and newer, the following Label Formats have been added:
- 20 labels (4x5) Landscape
- 32 labels (4x8) Landscape
The above Label Formats support the following Metcash Fields on Metcash Products which are populated via the Metcash XML Host:
- Unit - E.g. ea, /kg, etc.
- Metcash Carton Quantity (MinimumOrderQuantity) - E.g. E.g. 1, 6, 8, 24, etc.
- WarehouseIndicator - E.g. W, D, Z, etc.
- ComplianceIndicator - E.g. 3, 4, etc.
- ProductGrade - E.g. R, A, C, B, etc.
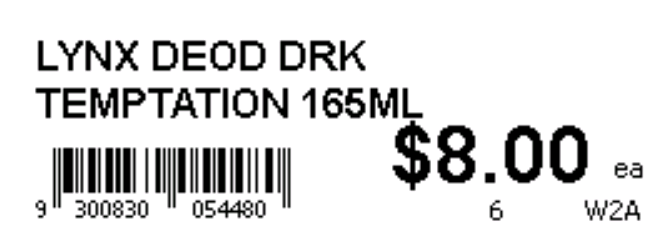
To demonstrate how the Metcash Fields appear on a label, a Stock Item was imported from a Metcash Host that contains the following Metcash Fields with the following data:
- MinimumOrderQuantity - 6
- WarehouseIndicator - W
- ComplianceIndicator - 2
- ProductGrade - A
The below is a Label produced using the format "20 labels (4x5) Landscape":
The below is a Label produced using the format "32 labels (4x8) Landscape":
To utilise the above Labels, go to: Back Office > Utilities > Labels.
- Data Type: Stock Items
- Output To: Idealpos A4 Labels
- Dimensions: Depending on the Label Stationery used, select "20 labels (4x5) Landscape" OR "32 labels (4x8) Landscape"; refer to the above examples which show the individual label style.
Add Stock Items to the Labels grid via the options on the right-hand side of the Labels window.
Refer to Selecting which Stock Items to Print Labels for more information.
Open topic with navigation