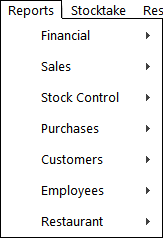
Idealpos breaks the reports into seven groups, with many reports contained within each group.
These groups are:
Where applicable, each report will have a Date Range to select from, along with other fields that help drill the report down to the information you require.
The End of Day Time, First Day of Week, Start of Financial Year and Sessions/Session Times can all be customised in Idealpos which will affect the date range (From/To) that's used when using any of the pre-defined periods outlined further below.
The locations in Idealpos where these settings can be customised are summarised below:
End of Day time - Back Office > Setup > Global Options > General > End of Day.
First Day of Week - Back Office > Setup > Global Options > General > First Day of Week.
Start of Financial Year - Back Office > Setup > Global Options > Miscellaneous > Start of Financial Year
Sessions - Back Office > Setup > Global Options > Restaurant > Sessions - Only session names and times that have been configured will appear as an available period in the reports that support the selection of a session.
Auto-Select dates are:
Get Shift Dates will display a list of Shift Dates. When selecting a Shift from the list, Idealpos will populate the From/To fields using the Date and Time when the Shift started/ended.
Select "Get Shift Dates".
A new window will appear with the following options:
Select a Shift > Press "OK".
If "Accounting Periods Only" is selected, the list will be filtered accordingly.
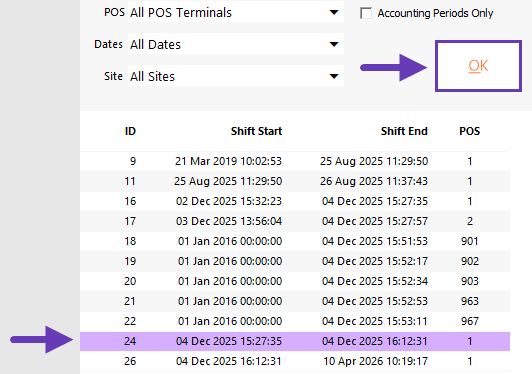
The From/To fields will be populated using the Date and Time which the Shift started/ended.

The report can be run as required to show the data for the selected Shift.
In some cases, there may only be a single field to select from as a range.
This allows you to customise the report fully, but entering the details specifically you want to find. E.g. 1-3, 5, 7-11.

When viewing a Report, you have numerous options available at the top of the screen and displayed as icons.
The top-left corner of the report includes the following options:
Settings - This option appears as a cog icon and will display a menu with the below options.
Clear Export Format - This will clear the default export format that has been set for the report.
Default Zoom - This option will display a list of zoom levels ranging from 70 to 200. All reports will be displayed using the Default Zoom and can be changed by choosing another zoom option from this menu.
Print - This option appears as a printer icon and pressing it will display a dialog box to select the desired printer to print the report to.
Email - This option appears as an envelope icon and pressing it will display an email popup prompt where you can enter the recipients of the email, Subject and Message for the email. Using the email function requires that the Email Settings are configured in Global Options. Refer to the Other Options page within the Global Options topic.
PDF - This option appears as a PDF icon and pressing it will display a "Save As" dialog box which can be used to browse to a folder location and enter a filename for where you want the PDF file saved.
Export - This option appears as an icon displaying a square with an arrow pointing outwards. Pressing this option will display a dialog box allowing the selection of the Format and Destination. If you do not have a default format, a prompt will be displayed after exporting asking if you would like to keep this as your Default Export Format. If "Yes" is selected, the Format that was selected will be used as the Default Export Format.
Zoom Out - This appears as a "-" icon and can be pressed to zoom out of the report.
Zoom In - This appears as a "+" icon and can be pressed to zoom into the report.
Go to First Page - This appears as a "|<" icon and can be pressed to go to the first page of the report.
Go to Previous Page - This appears as a "<" icon and can be pressed to go to the previous page of the report.
Go to Next Page - This appears as a ">" icon and can be pressed to go to the next page of the report.
Go to Last Page - This appears as a ">|" icon and can be pressed to go to the last page of the report.
Search - This option appears as a blank field with a magnifying glass displayed within it. This can be used to search the contents of the report for a specific numeric or text value in the report. To use the search function, enter a text or numeric value into the field, then press the magnifying glass icon to search. The report will be searched for the value and the first result that is found will be highlighted inside a green rectangle. You can press the magnifying glass icon repeatedly to search for the next occurrence of the value entered in the search field.

Each report has the ability to be Printed, Exported, Saved as PDF or Emailed.
A number of reports have an option to set the selections as Default.
Most reports are able to be configured as a shortcut, and can also be used in the Scheduled Reports module.
To set a report as a shortcut, press the S button to the left of the X when viewing it.

When reports are set as shortcuts, you can move/resize them anywhere on your screen to either view the POS screen or look at other shortcut reports side by side.
To do this, press and hold anywhere in the grey menu area at the top of the screen where there are no buttons to move the report around the screen.
An example of the blue area that doesn't contain any buttons is displayed below.

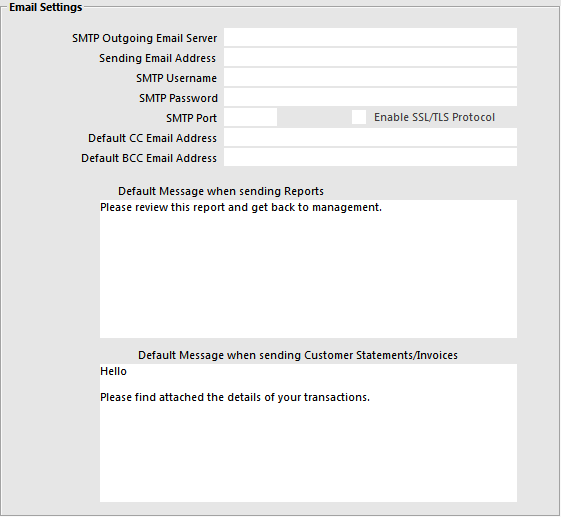
This function allows you to create a default message that will be sent when you send reports.
There are two separate messages that you can select.
Go to Setup > Global Options > Other Options > Email Settings > Default Message when sending Reports/Default Message when sending Customer Statements/Invoices

Open a report and select the Export option at the top.

Select the type of file you would like to export to.
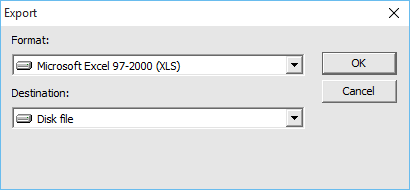
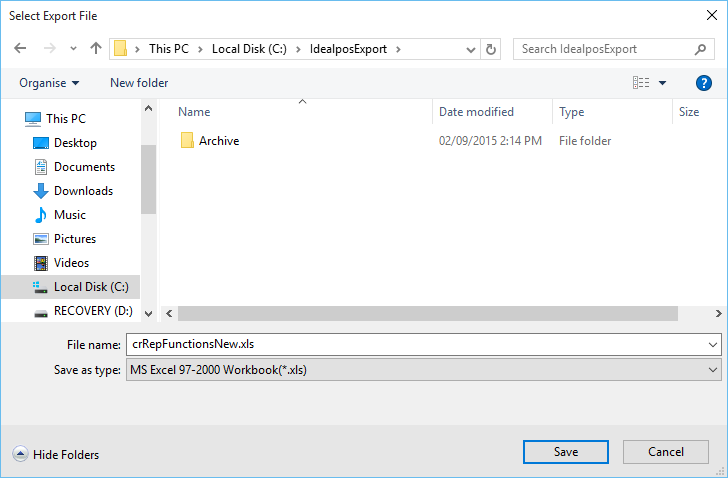
Select an export location.
If you do not have a default setup already, you will be offered the choice to set this format as your default.

To clear the Export Format, run any report from the Reports Menu.
Note that the Export Format can only be cleared while viewing a report
Whilst viewing a report, press the cog icon on the top-left corner of the screen, then select "Clear Export Format".

Confirm your decision.